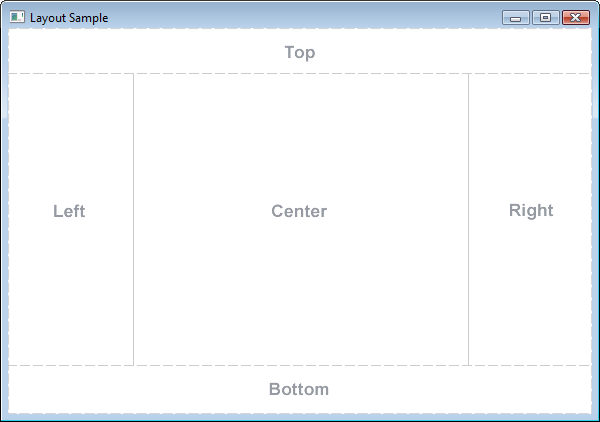
Description of "Figure 1-1 Sample Border Pane"
A border pane is useful for the classic look of a tool bar at the top, a status bar at the bottom, a navigation panel on the left, additional information on the right, and a working area in the center.
If the window is larger than the space needed for the contents of each region, the extra space is given to the center region by default. If the window is smaller than the space needed for the contents of each region, the regions might overlap. The overlap is determined by the order in which the regions are set. For example, if the regions are set in the order of left, bottom, and right, when the window is made smaller, the bottom region overlaps the left region and the right region overlaps the bottom region. If set in the order of left, right, and bottom, when the window is made smaller, the bottom region overlaps both the left and right regions.
Example 1-1 shows the code for creating the border pane that is used for the UI that is built by the Layout Sample application. The methods that create the layout panes used in each region are described in the remaining sections of this topic.
Example 1-1 Create a Border Pane
| BorderPane border = new BorderPane();
HBox hbox = addHBox()
border.setTop(hbox);
border.setLeft(addVBox());
addStackPane(hbox); // Add stack to HBox in top region
border.setCenter(addGridPane());
border.setRight(addFlowPane());
|
Note that the bottom region of the border pane is not used in this sample. If you want to add something to the bottom region, use the following statement and replace node with the control of your choice:
border.setBottom(node);
HBox
The HBox layout pane provides an easy way for arranging a series of nodes in a single row. Figure 1-2 shows an example of an HBox pane.
Figure 1-2 Sample HBox Pane

Description of "Figure 1-2 Sample HBox Pane"
The padding property can be set to manage the distance between the nodes and the edges of the HBox pane. Spacing can be set to manage the distance between the nodes. The style can be set to change the background color.
Example 1-2 creates an HBox pane for a tool bar that contains two buttons.
Example 1-2 Create an HBox Pane
| public HBox addHBox() {
HBox hbox = new HBox();
hbox.setPadding(new Insets(15, 12, 15, 12));
hbox.setSpacing(10);
hbox.setStyle("-fx-background-color: #336699;");
Button buttonCurrent = new Button("Current");
buttonCurrent.setPrefSize(100, 20);
Button buttonProjected = new Button("Projected");
buttonProjected.setPrefSize(100, 20);
hbox.getChildren().addAll(buttonCurrent, buttonProjected);
return hbox;
}
|
The setTop() method in Example 1-1 adds the HBox pane to the top region of the border pane. The result is shown in Figure 1-3.
Figure 1-3 HBox Pane in a Border Pane

Description of "Figure 1-3 HBox Pane in a Border Pane"
VBox
The VBox layout pane is similar to the HBox layout pane, except that the nodes are arranged in a single column. Figure 1-4 shows an example of a VBox pane.
Figure 1-4 Sample VBox Pane

Description of "Figure 1-4 Sample VBox Pane"
The padding property can be set to manage the distance between the nodes and the edges of the VBox pane. Spacing can be set to manage the distance between the nodes. Margins can be set to add additional space around individual controls.
Example 1-3 creates a VBox pane for a list of options.