Class 1

1. The theme: Computation of metrics of productivity of computer system: speed, efficiency, energy expenses, Amdal's law, CPU time.
2. The aim: The aims of this class are to introduce the students to computer lab rules and provide students with an idea of information in a computer understanding аnd calculation of computer system performance metrics.
3. The learning objectives: Having studied this class the student will be able to:
- behave properly in a computer lab;
- identify the health issues related to working with computers;
- key indicators (metrics) of system performance;
- know Amdahl's law;
- the CPU resources consumption (CPU,%).
- identify the specifications of computers;
- explain what a computer system is as well as its parts;
- translate numbers from one system to another
- know information units.
4. Key questions of the theme:
1. What rules for protecting yourself computer lab do you know?
2. What is Computation the main metrics of productivity of computer system?
3. What is the Amdahl's Law?
4. What are the main specifications of the computer do you know?
5. How many generations of computers do you know?
6. What are basic operations of a computer do you know?
7. What are the units of information do you know?
5. The main forms / methods / technology of training to achieve the final learning outcomes discipline: Work in pairs.
6. Types of control for assessing the level of achievement of the final learning outcomes of the discipline: solve problems, oral survey
References
1. Urmashev B.A. Information and communication technology: Textbook / B.A. Urmashev. – Almaty, 2016. - 410 p., ISBN 978-601-7940-02-7 (A textbook in English with the stamp of the Ministry of Education and Science of the Republic of Kazakhstan)
2. Lorenzo Cantoni (University of Lugano, Switzerland), James A. Danowski (University of Illinois at Chicago, IL, USA) Communication and Technology, 576 p.
3. Нурпеисова Т.Б., Кайдаш И.Н. ИКТ. Учебное пособие / Алматы, изд-во Бастау, 2017, 183с.
4. Nurpeisova T.B., Kaidash I.N. ICT, Almaty, Bastau, 2017. 241 p.
Control:
Tasks
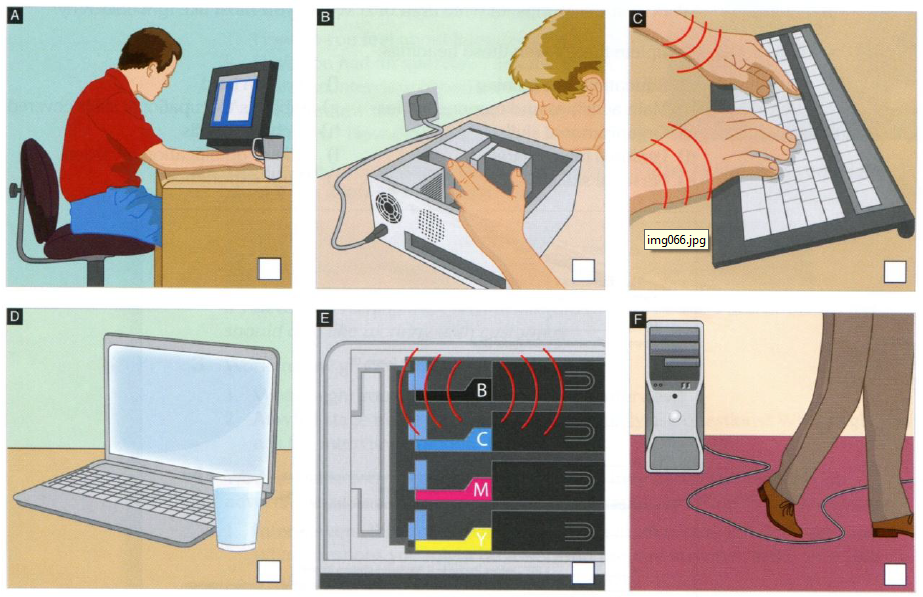
1. Label this diagram with the advice 1-8
1. 
There should be clearance under the work surface. ____
2.
You should have your feet on the floor.___
3.
Make sure your forearms and hands are in a straight line.____
4.
Your lower back should be support. ____
5. Your screen should be positioned to avoid reflected glare. ____
6.
Keep your shoulders relaxed. ____
7.
You should have your things tilted slightly. ____
8. Make sure the top of the screen is at or slightly below eye level. ____
2. Match illustrations A-F to dangers 1-6 in the leaflet below. Then match dangers 1-6 to the pieces of advice a-f.
Safety at work
Dangers
Advice
| | 1
| Backache
| a
| Move the cables.
|
| 2
| Electric shock
| b
| Don’t bend your back while sitting at a desk!
|
| 3
| RSI (repetitive strain injury)
| c
| Let it cool down.
|
| 4
| Trips and falls
| d
| Unplug!
|
| 5
| Short circuit
| e
| Keep your wrists straight.
|
| 6
| Burns
| f
| Don’t spill your drink.
|
3. True/False Questions.
T F 1. Do not use the computer during a storm.
T F 2. Spray your computer with household cleanser to keep it clean.
T F 3. Spilling liquids on your computer won’t hurt it.
T F 4. Keeping your computer dust-free can help it last longer.
T F 5. Your mouse should never need cleaning.
T F 6. It won’t hurt to eat meals while using the computer.
T F 7. Install one program, and then test your computer for problems before installing another program.
T F 8. Downloading from Internet sites could expose your computer to dangerous viruses.
T F 9. Surge protectors can help guard against lighting, but may not be complete protection.
T F 10. You should remove the computer cover monthly to clean inside.
T F 11. Opening an e-mail attachment could download a virus into your computer keyboard.
T F 12. Canned air can be used to clean your computer keyboard.
T F 13. There is room at the computers to store your books and supplies.
T F 14. You can bring a snack to the computer lab.
T F 15. Part of good computer posture is to sit up straight with feet flat on the floor.
T F 16. Playing Solitaire without teacher permission is computer misuse.
T F 17. You can modify the computer desktop and screensaver in the labs.
T F 18. Copyright law prohibits students from copying on-line information and turning it in as their own work.
T F 19. Multimedia presentations must give copyright information about websites used for project research.
T F 20. It is legally to copy software or music CD’s from a friend and not buy them from a store.
T F 21. You can use a chat program in the computer lab if your work is done.
T F 22.The definition of etiquette is to use good manners, be polite, and respect the property of others.
T F 23. You should know the location of the fire extinguisher and the first aid box and how to use them in case of an emergency.
T F 24. It is OK to step on electrical wires or any other computer cables.
T F 25. You can insert metal objects such as clips, pins and needles into the computer casings
4. Fill the table given below for each generation of computers.
| Generation
| Key characteristics
|
| First generation
(1946-1956)
|
|
| Second generation
(1956-1963)
|
|
| Third generation
(1964-1971)
|
|
| Fourth generation
(1971-present)
|
|
| Fifth generation
(present and beyond)
|
|
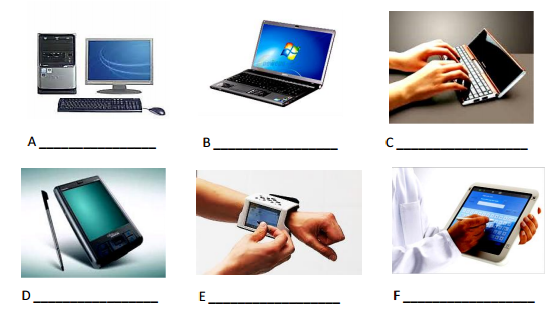
5. Name the following different types of personal computers.
6. Solve examples
| Variant
| 1
| 2
| 3
| 4
| 5
| 6
| points
|
| 10→16
| 235
| 568
| 124
| 486
| 841
| 336
| (3-6)
|
| 10→2
| 168
| 187
| 227
| 145
| 219
| 154
| (3-6)
|
| 2→16
| 10100100
| 11101101
| 10011100
| 10111001
| 11000101
| 11111001
| (3-6)
|
| 2→8
| 10110011
| 10101100
| 10001110
| 10101101
| 10111011
| 10100101
| (3-6)
|
| 2→10
| 11000010
| 10001000
| 10101010
| 10010111
| 10111101
| 10011101
| (2-6)
|
| 16→10
| А1СF
| 9АD4
| DС5Е
| В74С
| 6Е7С
| 2АD4
| (3-6)
|
| 16→2
| 3DС
| 4FА
| 9D5
| 7В9
| 2С6
| 5FЕ
| (4-7)
|
| 8→2
| 7534
| 6234
| 2574
| 1245
| 3675
| 1245
| (4-7)
|
| Variant
| 7
| 8
| 9
| 10
| 11
| 12
|
|
| 10→16
| 754
| 225
| 678
| 943
| 195
| 445
| (3-6)
|
| 10→2
| 130
| 917
| 456
| 457
| 284
| 182
| (3-6)
|
| 2→16
| 1100100
| 10011010
| 10111011
| 10100110
| 10101010
| 11001001
| (3-6)
|
| 2→8
| 1001000
| 11001100
| 11011110
| 10011111
| 10001001
| 11000010
| (3-6)
|
| 2→10
| 1111100
| 11111000
| 10011,100
| 11001010
| 10100101
| 11101101
| (2-6)
|
| 16→10
| 4Е3F
| 4А5Е
| 5С6А
| 5В6С
| 9Е4F
| 6В4D
| (3-6)
|
| 16→2
| 6FF
| 2Е7
| 4D2
| 7DС
| 7 DD
| 3В5
| (4-7)
|
| 8→2
| 6537
| 5643
| 4517
| 2743
| 2556
| 6541
| (4-7)
|
References
1. Craig Van Slyke Information Communication Technologies: Concepts, Methodologies, Tools, and Applications (6 Volumes), 2013. - p. 4288.
2. Lindros K. PC Basics with Windows 7 and Office 2010. - Jones & Bartlett Learning. 2012. – 318 p.
3. Brian K. Williams, Stacey C. Sawyer Using information technology: a practical introduction to computers &communication: complete version, New York, 10020. Copyright © 2011 by the Mcgraw-Hill, 606 p.
Control:
1. Practical task. Personalization of Windows.
1.1. Changing the desktop theme.
1.2. Steps to follow:
1.  Right-click a blank area on the desktop, and a menu will appear.
2. Choose Personalize (Персонализация).
This is an alternate way into the Control panel that shortcuts the main screen and goes right into the Personalization category.
3. Choose the theme from the listed themes.
1.3. Changing the screen resolution.
Steps to follow:
1. Right-click a blank area on the desktop, and a menu will appear.
2.  Choose Screen resolution (Разрешениеэкрана).
3. Set the resolution from the drop down list you get under the resolution.
1.4. Changing the Taskbar and Start menu properties.
Steps to follow:
1. Right-click a blank area on the desktop, and a menu will appear.
2. Choose Personalize (Персонализация).
3. Click Taskbar and Start menu (ПанельзадачименюПуск).
4. Set the required change from the Taskbar and Start menu window.
5. Click OK.
1.5. Changing the Icon size.
1. Right-click a blank area on the desktop and hover the mouse over the View (Вид) command. A submenu appears.
2. Click Large Icons (Крупныезначки). The icons on the desktop become larger.
3. Right-click on the desktop and hover the mouse over the View (Вид) command again.
4. Click Medium Icons (Обычныезначки). The icons return to their original size.
1.6. Changing the Time Zone.
1. Notice the time shown on the clock in the taskbar.
2. Click on the clock, and click Change Date and Time Settings (Изменение настроек даты и времени). The Date and Time (Дата и время) dialog box opens.
3. Click Change Time Zone (Изменить часовой пояс). The Time Zone Settings dialog box opens.
4. Click the current time zone. A menu of zones opens.
5. Click the (UTC-6:00) Central Time (US &Canada) (Центральное время (США и Канада) time zone.
6. Click OK.
7. Click OK to close the Date and Time dialog box.
8. Notice the time shown on the clock in the taskbar.
9. Repeat steps 2 through 7, choosing the (UTC-6:00) Astana (Астана) time zone in step 5.
1.7. Navigating Windows Explorer.
1. Click the Windows Explorer button  in the taskbar to launch Windows Explorer.
2. Click the clear right arrow to the left of the Libraries (Библиотеки) entry in the navigation pane. (If the Libraries (Библиотеки) entry is already expanded, skip this step).
3. Click the Pictures (Изображения) folder in the navigation pane.
4. Click the black right arrow next to the Pictures (Изображения) entry in the address bar.
5. Select a folder from the list that appears – for example, the Public Pictures (Общиеизображения) folder.
6. Double-click the Sample Pictures (Образцыизображений) to display its contents.
1.8. Creating Folders.
1. Click the Windows Explorer button in the taskbar to launch Windows Explorer.
2. Right-click the Documents (Документы) library in the navigation pane, select New (Создать), and then select Folder (Папку).
3. A new folder appears in the navigation pane with its name, New Folder (Новаяпапка), highlighted. Type the folder’s name – in this case, Stomatology – and press Enter.
4. Open the Stomatology folder.
5. Click the New Folder (Новаяпапка) button in the Windows Explorer command bar.
6. A new folder appears in the file list with its name, New Folder (Новаяпапка), highlighted. Type the folder’s name – in this case, Doctors – and press Enter.
7. Repeat steps 4 through 6 to create another subfolder called Patients.
8. Repeat steps 4 through 6 to create another subfolder called Services.
1.9. Moving a Folder with Cut and Paste.
1. In the Windows Explorer file list, click the item you want to move to select it – in this example, the Patients subfolder in the Stomatology folder.
2. Click the Organize (Упорядочить)button.
3. Select Cut (Вырезать). The item you selected is copied to the Clipboard.
4. In Windows Explorer, open the destination folder – that is, the folder in which you want to paste the item currently on the Clipboard. In this example, the destination folder is the Doctors folder, which is a subfolder of the Stomatology folder.
5. Click the Organize (Упорядочить)button.
6. Select Paste (Вставить). You have now pasted the item into the folder. Note that because you cut and pasted the item rather than copied it, it appears only in the Doctors folder.
1.10. Searching for files and folders. Searching for an Item using Windows Explorer. (4-6)
1. Open the folder you think contains the item you want to find.
2.  Type your search criteria in the search box in the window’s upper-right corner. As you type, Windows Explorer displays items that match your criteria. Find Patients folder.
Searching for an Item using the Windows Start menu.
1. Click the Start button.
2. Type your search criteria in the search box. As you type, Windows Explorer displays items that match your criteria. Find Patients folder.
2. Create directories on your computer as shown below.
3. Practical task. 3.1.Draw the following pictures in the graphic editor Paint.
3.2. Copy the pictures in WordPad, type the index texts in one column.
3.3. Create a new folder on the desktop and save it to this folder.


4. Calculate the following tasks on the calculator:
1) 1223.4+564.7*54= 6) 6512: 12-342=
2) 87698*6512:45= 7) 564.7*5487698-651=
3) 6512:45*8-12= 8) 53=125;
4) 698+564.7*5487698*12-342= 9)  ;
;
5) 45*8-12+1223.487*12-342= 10) 
5. Answer the following questions.
1. What are the system requirements of Windows 7/8?
2. How to install OS Windows?
3. Briefly describe the purposes of following components of the Windows 7/8 interface: Start Menu; Task Bar;Notificationarea.
4. What is a file system? Briefly describe the file system used by Windows 7/8.
5. What are Libraries? Name four default libraries available with Windows 7/8.
6. State the advantages of using compressed files.
7. Where to get help and support?
8. What are Windows Gadgets? Name five gadgets available in Windows 7/8.
Class 3
1. The theme: Determination of requirements to development "convenient in application" the website.
2. The aim: The goal of this lesson is to provide students with interactive web pages and create a simple website.
3. The learning objective: Having studied this class the student can get idea about:
-interactive web page;
-about creating a web site
4. Key questions of the theme:
1. What is web technology?
2. What is a webpage?
3. What is the Mobirise?
4. Structure of the Mobirise.
5. What is the block for webpage?
5. The main forms / methods / technology of training to achieve the final learning outcomes discipline: Computer based teaching, project method.
6. Types of control for assessing the level of achievement of the final learning outcomes of the discipline: individual task, oral survey.
References
1. Craig Van Slyke Information Communication Technologies: Concepts, Methodologies, Tools, and Applications (6 Volumes), 2013. - p. 4288.
2. Brian K. Williams, Stacey C. Sawyer Using information technology: a practical introduction to computers &communication: complete version, New York, 10020. Copyright © 2011 by the Mcgraw-Hill, 606 p.
3. Kevin Bond and Sylvia Langfield AQA Computing - Nelson Thornes Ltd 2009.
4. Lindros K. PC Basics with Windows 7 and Office 2010. - Jones & Bartlett Learning. 2012.
8. Control:
Tasks:
1. Practical exercises: using the Mobirise program, create and arrange a site on the following topics:
а) advertising site of the South Kazakhstan Medical Academy
b) advertising site of your faculty
с) advertising site of the city of Shymkent
d) advertising site of the medical center, dental clinic, pharmacy
Class 4
1. The theme: Development of database structure, creation of tables and requests.
2. The aim: Acquaintance of students with the database management system and introduce one of DBMS: SQL. Creating a medical database: tables, queries. Work with forms and reports.
3. The learning objective: Having studied this class the student will be able to:
- create a tables;
- work with tables;
- import data from other sources;
- understand what queries are;
- create a queries;
- understand what forms are;
- create a forms;
-understand what reports are;
- create a reports.
4. Key questions of the theme:
1. What is a Database?
2. What types of database do you know?
3. What is MS Access?
4. What main objects of MS Access do you know?
5. The main forms / methods / technology of training to achieve the final learning outcomes discipline: Computer based teaching, project methods.
6. Types of control for assessing the level of achievement of the final learning outcomes of the discipline: individual task, oral survey.
References
1. Shynybekov D.A., Uskenbayeva R.K., Serbin V.V., Duzbayev N.T., Moldagulova A.N., Duisebekova K.S., Satybaldiyeva R.Z., Hasanova G.I., Urmashev B.A. Information and communication technologies. Textbook: in 2 parts. Part 1, 1st ed. - Almaty: IITU, 2017. - 588 p., ISBN 978-601-7911-04-1 (A textbook in English with the stamp of the Ministry of Education and Science of the Republic of Kazakhstan)
2. Urmashev B.A. Information and communication technology: Textbook / B.A. Urmashev. – Almaty, 2016. - 410 p., ISBN 978-601-7940-02-7 (A textbook in English with the stamp of the Ministry of Education and Science of the Republic of Kazakhstan)
3. Rendell I., Mott J. Advanced database projects in Access 2007. –London, Hodder Education. 2014.
4. https://support.office.com/en-ie/article.
Control
Practical tasks
1. Creating a single-table database.
1.1 Start MS Access.
1.2 In the Blank database pane on the right-hand side in the window enter the name of database “ Stomatology ”.
1.3 Click on the Browse button (yellow folder) and choose where you would like to save this database. Press OK.
1.4 Click on the Create (Создать) button and you will be present a new database.
1.5 Select the Create (Создание) tab in the toolbar at the top of the screen, then click on the Table Design (Конструктортаблиц) button  in the Tables group(Таблицы).
1.6 At the top of the Table Design window in each row, enter a field names and data types (see table bellow). Use figure 1 as a guide.
| Field Name (Имя поля)
| Data Type (Тип данных)
|
| DoctorID
| Number (Числовой)
|
| FirstName
| Short Text (Текстовый)
|
| LastName
| Short Text (Текстовый)
|
| Position
| Short Text (Текстовый)
|
| CabinetID
| Number (Числовой)
|
| WorkingTime
| Short Text (Текстовый)
|
| Services
| Short Text (Текстовый)
|
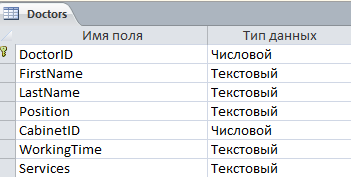
Figure 1.
1.7 In the clinic are two floors and cabinets ID within the range of from 100 to 130 and from 200 to 230.
At the bottom of the Table Design window in the Field properties (Свойстваполя) partenter the condition for the CabinetID field.
In the Condition for value (Условиеназначение) row click the Expression Builder (Построительвыражений) button  , enter the condition: >=100 and <=130 or >=200 and <=230.
In the Error information (Сообщениеобошибке) row enter “ This ID isn’t found ”(figure 2).

Figure 2.
1.8 Once all the fields are added, click the Save icon. Enter a table name “ Doctors ”. Click OK and you will see your table in the navigation pane.
1.9 A primary key is a field or set of fields with values that are unique throughout a table. Values of the key can be used to refer to entire records, because each record has a different value for the key. Each table can only have one primary key.
Make the DoctorID a primary key for this table, so select DoctorID field, click on Primary Key (Ключевоеполе)  option in the ribbon.
You can see a little key icon that will show up next to that field.
1.10 Save the table and give this table name “ Doctors ”.
2. Practical task. Filling the database.
2.1 Creating a lookup fields in MS Access tables can help improve the efficiency of the data entry process for your database. A lookup field can display a user friendly value that is bound to another value in the source data table or value list.
2.2 Create the table Time_LookupField (figure 3). This table will be used as lookup field for WorkingTime field from “ Doctors ” table.

Figure 3.
2.3 Create in MS Excel the table TypeOf Service_ LookupField (figure 4).

Figure 4.
This table will be used as lookup fieldfor Services field from “ Doctors ” table.
2.4 Define cell format – Text (Текстовый). Save the table TypeOf Service_ LookupField on the desktop.
2.5 Open database “ Stomatology ”go to External data (Внешниеданные) tab, select Excel option.
2.6 Browse the Excel file from which you want to import data, select the file TypeOf Service_ LookupField.
1.6. In the next dialog box Import of spreadsheet (Импортэлектроннойтаблицы) select List 1 (Лист 1), click Next (Далее) button.
2.7 In the Preview, you can see that the first row contains the column headings. Check the check box and click Next (Далее).
2.8 You will see a dialog box where you can set the data type for each field. If you don’t want to import any field, just check the check box which says do not import field. Click Next (Далее) button.
Here are the different options for primary key. Select the last option No primary key (Несоздаватьключ) and click Next (Далее).
2.9 In the last dialog box enter the table name “ TypeOf Service_ LookupField ” and click Finish (Готово).
2.10 Go to the Navigation pane. The new table is added here and when you open the newly added table you will see all of your data in Access.
2.11 Create the table Staff_LookupField (figure 5). This table will be used as lookup field for Position field from “ Doctors ” table. For Salary and Bonus fields select Currency (Денежный) format.
2.12 Make the Position a primary key for this table.
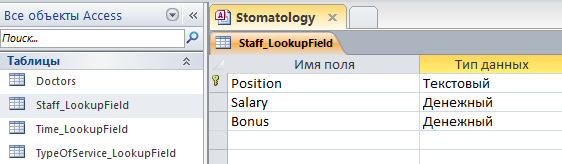
Figure 5.
3. Filling the tables.
3.1 Open the Time_LookupField table, enter the data (figure 6).
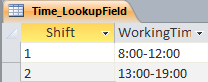
Figure 6.
3.2 Open the Staff_LookupField table, enter the data (figure 7).

Figure 7.
4. Creating of Lookup Field.
Case 1. Table Design (Режимконструктора)
4.1 Open the Doctors table.
4.2 Choose Home (Главная) tab. Click Views (Режим ы)option in the ribbon. Choose Table Design (Конструктор).
4.3 For Position field in the Field properties (Свойстваполя) part select Lookup (Подстановка).
4.4 In the Dysplay Control (Типэлементауправления) row select Combo box (Полесосписком).
4.5 In the Row Source (Источникстрок) row select Staff_LookupField table (figure 8).
Case 2. Lookup Wizard (Мастерподстановок)
4.6 For WorkingTime field in the column Data Type select in drop-down menu Lookup Wizard (Мастерподстановок) (figure 9).

Figure 8.
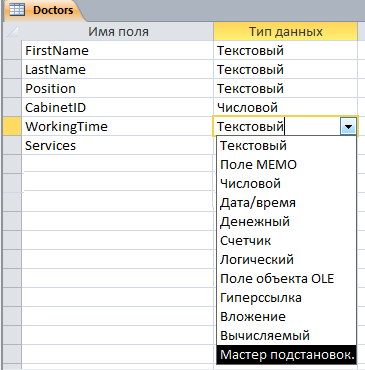
Figure 9.
1.1 In the next dialog box click Next (Далее) button.
1.2 In the next dialog box select Table Time_LookupField, click Next (Далее) button.
1.3 In the next dialog box from the Available Fields (Доступныеполя) list, select the WorkingTime field, and then click the > button to add it to the Selected Fields (Выбранныеполя) list, clickseveral times Next (Далее) button.
1.4 Click Finish (Готово) button.
Case 3. Query language SQL
1.5 For WorkingTime field in the Field properties (Свойстваполя) part select Lookup (Подстановка).
1.6 In the Dysplay Control (Типэлементауправления) row select Combo box (Полесосписком).
1.7 In the Row Source Type (Типисточникастроки) row select Table/Query (Таблицаилизапрос).
1.8 In the Row Source (Источникстрок) row click the Expression Builder (Построительвыражений) button and select View (Режим), SQL View (figure 10).
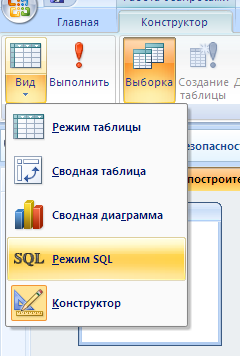
Figure 10.
The query is:
SELECT Time_LookupField.WorkingTime FROM Time_LookupField;
INDEPENDENTLY create the lookup field for Services field.
4.15 Enter the data in the Doctors table, use lookup fields (figure 11).

Figure 11.
2. Practical task. Inserting of the OLE Object.
2.1 Save several photos of different people in the any folder in *. bmp format.
2.2 Open the“ Doctors ” table.
2.3 In the Home (Главная)tab of the ribbon click the Views (Режимы) option and choose Table Design (Конструктор).
2.4 Add a new field DoctorPhoto, type of data – OLE Object (Полеобъекта OLE).
2.5 Select the Home (Главная)tab in the toolbar at the top of the screen, then click the Views (Режимы) group and select Datasheet View (Режимтаблицы).
2.6 Right-click the DoctorPhoto field and choose Add object (Вставитьобъект).
2.7 In the dialog box select Create from the file (Создатьизфайла).
2.8 For searching of the file, use the Browse (Обзор) button (figure 12). Click OK.

Figure 12.
6. Practical task.Adding a new field in the table.
6.1 Open the“ Doctors ” table.
6.2 In the Home (Главная)tab of the ribbon click the Views (Режимы) option and choose Table Design (Конструктор).
6.3 Add a new field “ Phone ”, type of data – Short Text (Текстовый).
6.4 Click on the Input Mask (Маскаввода) box on the General (Общие) tab of the Field Properties pane at the bottom of the window.
6.5 Click the button to the right of the Input Mask field. This will open the Input Mask wizard which will walk you through the process.
6.6 Save the table.
6.7 In the dialog box select List (Список) button.
6.8 Enter the data. Use figure 13 as a guide.
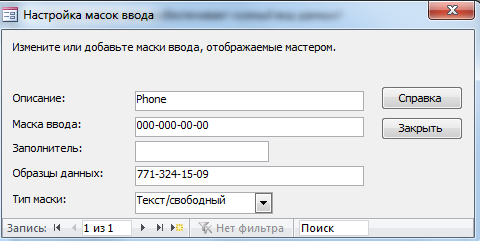
Figure 13.
6.9 Click the Close (Закрыть) button.
6.10 Click the Input Mask from list for Phone field.
6.11 Click the Finish (Готово) button.
6.12 Enter the data for Phone field in “ Doctors ” table (figure 14).
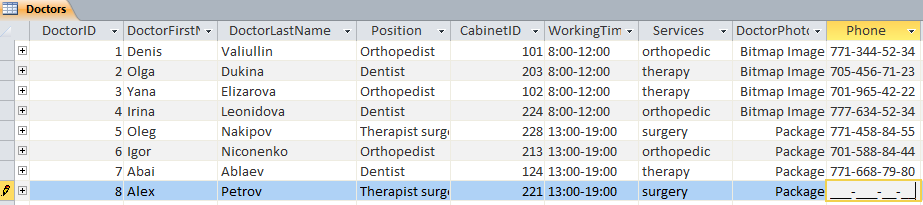
Figure 14.
7. Practical task. Filtering of data.
7.1 Open the“ Doctors ” table.
7.2 Select the Home (Главная)tab,then click on the Views (Режимы) group and select Datasheet View (Режимтаблицы).
7.3 Select the Position field.
7.4 Click on Filter (Фильтр)  option in the ribbon.
7.5 Select Orthopedist record, click OK.
7.6 The records that contain “ Orthopedist ” are displayed (figure 15).

Figure 15.
7.8 Click on Remove Filter (УдалитьФильтр)  option in the ribbon. All the records in the table are displayed.
7.9 Rename the fields FirstName to DoctorFirstName, LastName to DoctorLastName in the table Doctors.
8. Practical task. Creating a new tables.
8.1 Start MS Access.
8.2 Create a “ Patients ” table.Enter a field names and data types (see table bellow) (figure 16).
| Field Name (Имяполя)
| Data Type (Типданных)
|
| PatientID
| Number (Числовой)
|
| PatientLastName
| Short Text (Текстовый)
|
| Address
| Short Text (Текстовый)
|
| HealthInsurance
| Short Text (Текстовый)
|
| Phone
| Short Text (Текстовый)
|
| Gender
| Short Text (Текстовый)
|
Figure 16.
8.3 Create an Input Mask (Маскаввода) for HealthInsurance field. Use model AB-1234.
8.4 Create an Input Mask (Маскаввода) for Phone field. See task 7.
8.5 Fill the table (not less than 15 records) (figure 17).

Figure 17.
8.6 Create a “ Services ” table.
8.7 Enter a field names and data types (see table bellow).
| Field Name (Имяполя)
| Data Type (Типданных)
|
| ServiceID
| Number (Числовой)
|
| TypeOfService
| Short Text (Текстовый)
|
| CharacteristicsOfService
| Short Text (Текстовый)
|
| Price
| Currency (Денежный)
|
| Discount
| Number (Числовой)
|
8.8 Fill the table.Use figure 18 as a guide.
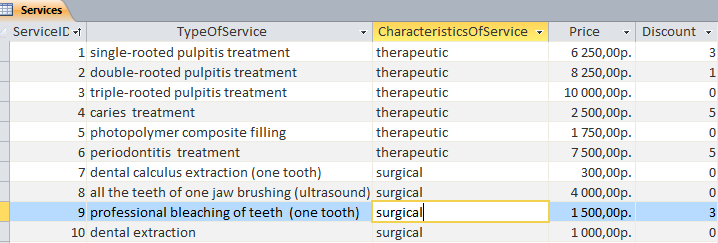
Figure 18.
8.9 Create a “ Journal ” table.
8.10 Enter a field names and data types (see table bellow).
| Field Name (Имяполя)
| Data Type (Типданных)
|
| Date
| Date&Time (Дата и время)
|
| PatientID
| Number (Числовой)
|
| PatientLastName
| Short Text (Текстовый)
|
| DoctorLastName
| Short Text (Текстовый)
|
| Position
| Short Text (Текстовый)
|
| Services
| Short Text (Текстовый)
|
| Quantity
| Number (Числовой)
|
8.11 For PatientID field create the lookup field from Patient table.
8.12 For DoctorLastName field create the lookup field from Doctors table.
8.13 For Services field create the lookup field from Services table.
8.14 PatientLastName and Position fields don’t fill.
9. Practical task.Creating the form.
9.1 Open Stomatology.accdb file.
9.2 Select the Create (Создание) tab, then click on the Form Wizard (МастерФ орм) button  in the Forms group.
9.3 From Tables/Queries (Таблицыизапросы) drop-down list, select Doctors table. Click on the double arrow to move all the fields at once, then click Next (Далее) button.
9. 4 The following screen in the Form Wizard (Мастерформ) will ask for the layout that you would like for form. You have columnar (водинстолбец), tabular (ленточный), datasheet (табличный) and justified (выровненный) layouts. Choose the justified layout here and then click Next (Далее).
9.5 Give a “ Doctors ” name for the form. Choose the first option to O pen the form to view or enter information (Открыть форму для просмотра и ввода данных) and click Finish (Готово) button (figure 19).
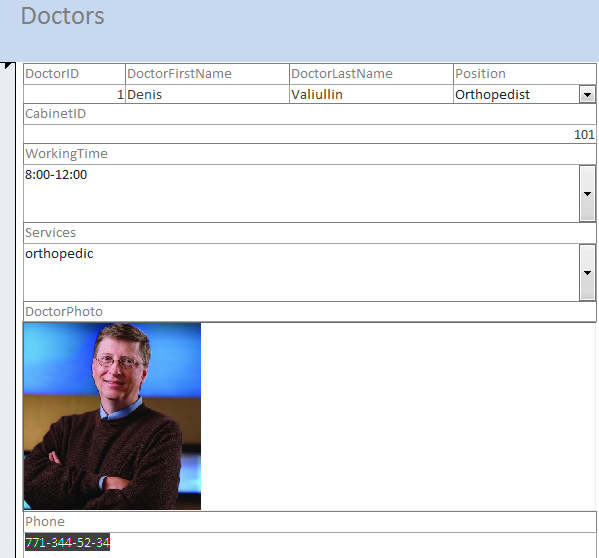
Figure 19.
10. Practical task.Creating thesimple query.
Queries are a way of searching for and compiling data from one or more tables.
10.1 Open Stomatology.accdb file.
10.2 Select the Create (Создание) tab, then click on the Query Wizard (МастерЗапросов) button  in the Queries (Запросы) group.
10.3 Select Simple Query Wizard (Простойзапрос)then click OK.
10.4 From Tables/Queries (Таблицыизапросы) drop-down list, select Doctors table. Use the arrows to move the fields from the Available Fields (Доступныеполя): window into the Selected Fields (Выбранныеполя): window. Select Doctor ID, DoctorLastName, Position fields. Click OK.
10.5 Give this query name “ DoctorsPositions ”, click Finish (Готово) button and you will see your query in the navigation pane.
Class 5
1. The theme: Processing of numerical information, editing formulas and creation
of charts in spreadsheet editors.
2. The aim: The objectives of this class are to provide knowledge and skills in performing calculations for the input data using the formulas and basic functions available in MS Excel, as well as in sorting / filtering the necessary data from an Excel sheet.
3. The learning objective: Having studied this class the student will be able to:
- insert formulas by using arithmetic operations with contents of the cells;
- use the basic functions;
- sort a given list of data into a given criteria;
- filter the required data from a data set satisfying a given condition(s);
- format the cells and the contents.
4. Key questions of the theme:
1. What are the advantages of using computerized Spreadsheets?
2. What are the four different types of operators use in Excel 2010?
3. What is the absolute and relative addressing of cells?
4. What kind of categories of functions embedded in MS Excel do you know?
5. What kind of errors in Excel do you know?
6. When use a “Filter” and “Sort” tools?
7. What are the available tools in Excel 2013 to customize charts?
5. The main forms / methods / technology of training to achieve the final learning outcomes discipline: Computer based teaching.
6. Types of control for assessing the level of achievement of the final learning outcomes of the discipline: individual task, oral survey.
References
1. Нурпеисова Т.Б., Кайдаш И.Н. ИКТ. Учебное пособие / Алматы, изд-во Бастау, 2017
2. Urmashev B.A. Information and communication technology: Textbook / B.A. Urmashev. – Almaty, 2016. - 410 p., ISBN 978-601-7940-02-7 (A textbook in English with the stamp of the Ministry of Education and Science of the Republic of Kazakhstan)
Control:
1. Practical task.
1. Start MS Excel.
2. Create a new workbook and save it as “ Marks.xls ”.
3. Change the name of the worksheet “ Sheet1 ” (Лист 1) to “ Marks1 ”. (Right-click on the sheet name and choose “ Rename ” (Переименовать)and rename it).
4. Delete the “ Sheet2 ” (Лист 2) and “ Sheet3 ” (Лист 3).
5. Insert a new worksheet and name it as “ Marks2 ”.
6. Using figure 1 as a guide, create the table in the worksheet “ Marks1 ”..
7. First type the names of the columns.
8. Mergethe necessary cells.
9. Select the column C (Index No) and change the column width (Home (Главная)→ Cells (Ячейки) → Format (Формат) → Cell Size (Размерячейки) → AutoFit Selection (Автоподборшириныстолбца)).
10. Select the column D (Name) and change the column width (Home (Главная) → Cells (Ячейки) → Format (Формат) → Cell Size (Размерячейки) → Column width (Ширинастолбца) and give a suitable width).
11. Change the width of the column H using mouse double-click.
12. Change the column width of column J using click on left mouse button on the column header.
13. Select the second row (Index No, Name, …, Total, Average) and change font size to 14 and the row height to give a suitable height.
14. Change the height of row using mouse (put the mouse pointer at the bottom edge of the row number (1,2,…) and move the mouse while pressing the left mouse button).
15. Complete the rest of the table as follows.
Insert a picture as shown below.
16. Click cell H10 and enter the formula: =E10+F10+G10 press Enter button.
17. Click cell H10, position the pointer on the lower-right corner of the cell (the fill handle) so that the pointer change to  , drag the to cell H23, then release the mouse button.
18. Click cell I10 and enter the formula: = AVERAGE(E10:G10) (= СРЗНАЧ (E10:G10)) press Enter button.
19. Drag the fill handle from cell I10 to cell I23.
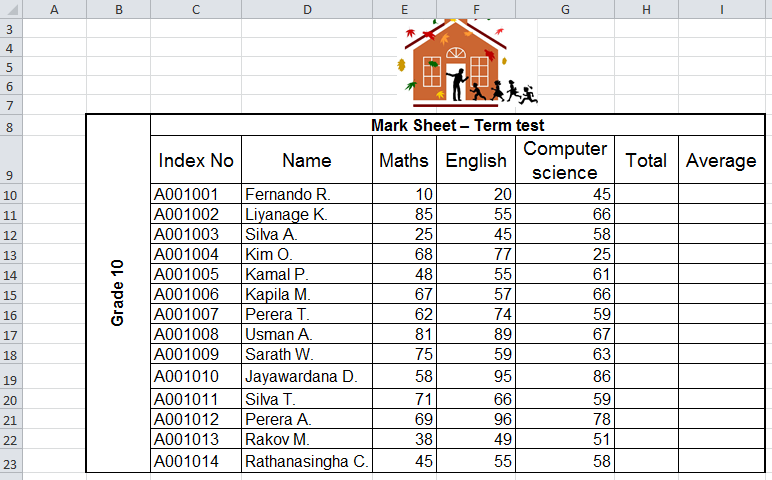
Figure 1.
20. Change the colors of column E, F and G to yellow, red, and orange respectively.
21. Apply a pattern to the text area of column B.
22. Apply cell styles (стилиячеек) to the columns H and I.
23. Save your work.
2. Practical task.
1. Start MS Excel.
2. Create a new file, then save it as “ Payroll Calculator ”.
3. Using figure 2 as a guide, create the table “ Health Professionals Payroll Calculator ”.
4. Click cell F11 and enter the formula: =C11*E11 press Enter button.
5. Drag the fill handle from cell F11 to cell F20.
Click cell G11 and enter the formula: =D11*(2*E11) press Enter button.
At Hippocrates Medical Clinic, overtime pay is calculated at twice the regular hourly rate times the number of overtime hours. The formula used to calculate overtime pay for the employee in row 11 is: O/T Hrs times (2 times Hrly Rate).
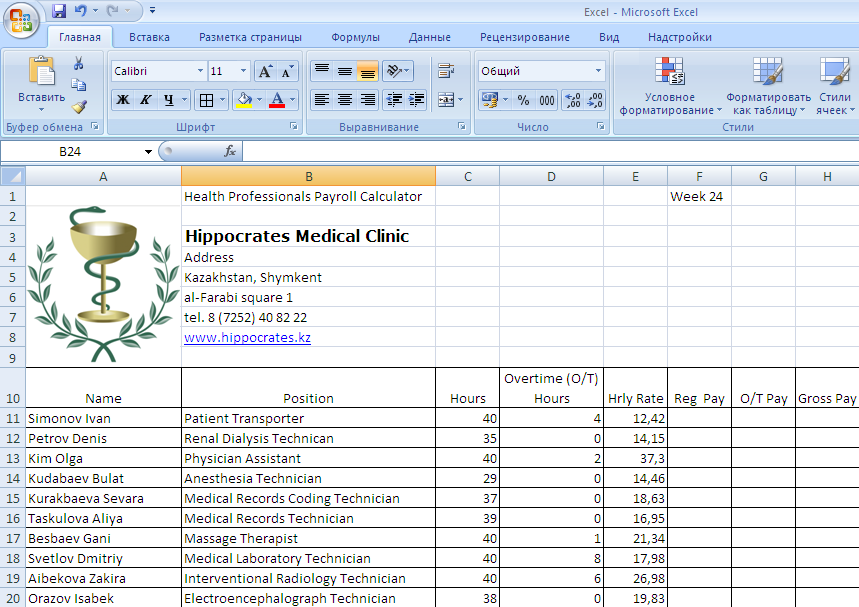
Figure 2.
6. Drag the fill handle from cell G11 to cell G20.
7. Click cell H11 and enter the formula: =F11+G11 press Enter button.
8. Drag the fill handle from cell H11 to cell H20.
9. Click cell A21 and enter the word “Total”.
10. Click cell C21 and click the Sum button  in the Editing (Редактирование)group on the Home (Главная) tab on the Ribbon. In cell C21 formula: =SUM(C11:C20) (= СУММ (C11:C20)) will appear.
11. Click cell C21 and drag the fill handle from cell C21 to cell H21.
12. Change the colors of row 21 to yellow.
13. Save your work.
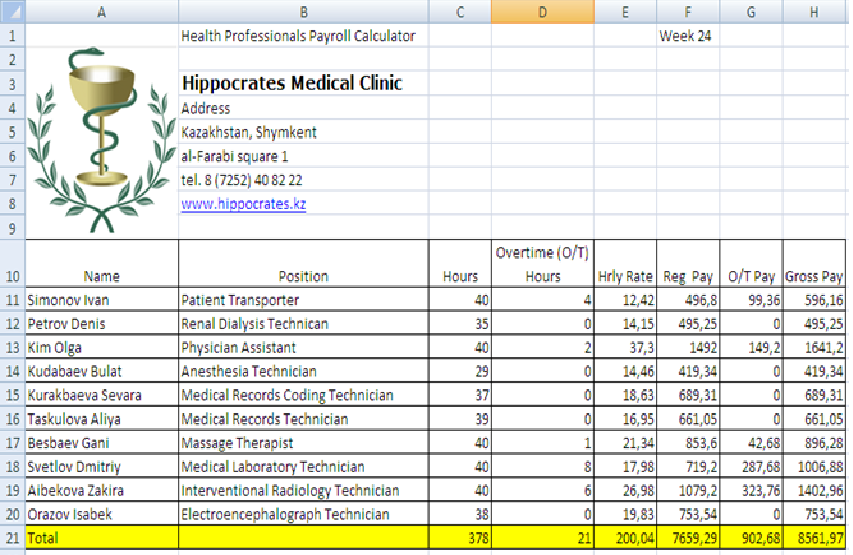
Figure 3.
3.Practical task. Creating charts.
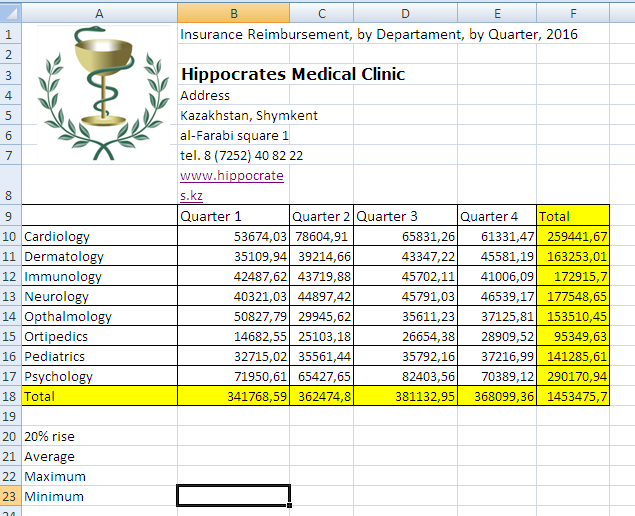
Figure 4.
1. Start Excel. Open the file “ Insurance Reimbursement Analysis ”.
2. Select the range A9:E17, then click the Insert tab (Вставка) on the Ribbon.
3. Click the Column (Гистограмма) button in the Charts group, then choose picture  in the chart gallery (figure 5).

Figure 5.
4. Selectthe range A10:A17, press and hold Ctrl button, select the range F10:F17, release Ctrl button, click the Insert tab (Вставка), click the Pie button (Круговая) in the Charts group, then choose picture  in the chart gallery.
5. Edit chart as shown in figure 6.
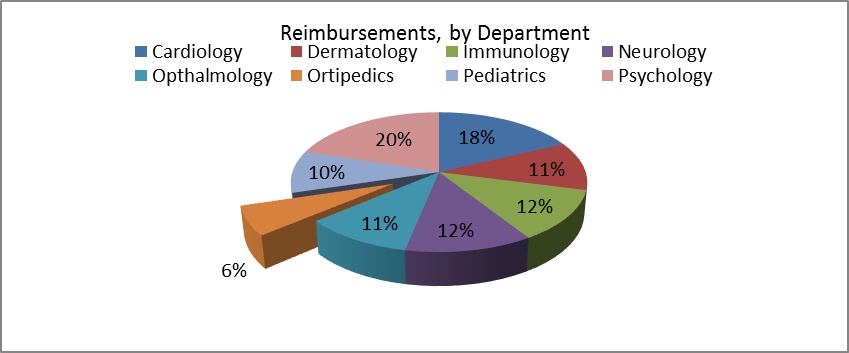
Figure 6.
Answer key questions.
Class 6
1. The theme: Design and creation of the presentations of lecture material, scientific reports, etc.
2. The aim: The aims of this class are to give an idea of Forming ideas of stages of creation of the presentation Microsoft Office PowerPoint. Develop skills, additions of drawings, charts and diagrams. Apply special effects, animations, sound and video fragments to strengthening of perception effect of the main information
3. The learning objective: Having studied this class the student can get idea about:
- Creating and Editing a Presentation
- The PowerPoint Window
4. Key questions of the theme:
1. Which of the following method can insert a new slide in current presentation?
2. Which command will you use in PowerPoint if you need to change the color of different objects without changing content?
3. Which file format can be added to a PowerPoint show?
4. What is a slide-title master pair?
5. How can you create a uniform appearance by adding a background image to all slides?
6. Which option on the custom animation task pane allows you to apply a preset or custom motion path?
7. Which of the following features should you use when typing in the notes text box?
5. The main forms / methods / technology of training to achieve the final learning outcomes discipline: Computer based teaching.
6. Types of control for assessing the level of achievement of the final learning outcomes of the discipline: individual task, oral survey.
References
1.Urmashev B.A. Information and communication technology: Textbook / B.A. Urmashev. – Almaty, 2016. - 410 p., ISBN 978-601-7940-02-7 (A textbook in English with the stamp of the Ministry of Education and Science of the Republic of Kazakhstan)
2.Lorenzo Cantoni (University of Lugano, Switzerland), James A. Danowski (University of Illinois at Chicago, IL, USA) Communication and Technology, 576 p.
3.Lindros K. PC Basics with Windows 7 and Office 2010. - Jones & Bartlett Learning. 2012.
4.Torben Lage Frandsen. Microsoft Office PowerPoint. – Ventus Publishing Aps. 2011. – 85.
Control:
1. Practical exercises: (25-50)
Create presentation on following themes:
1. “My future profession”
2. “My family”
3. “My university”
4. “My hobby”
5. “Information technologies”
6. “Computer devices”
7. “Holidays”
8. “Travelling”
9. “World Wildlife”
10. “Nature”
Answer key questions.
Class 7
1. The theme: Creation of a simple network configuration. IP addressing. Monitoring of a network. Analysis of traffic. Use of sniffers for the analysis of network packets
2. The aim: The aims of this class are to develop a solid grasp of network by introducing the basic concepts.
3. The learning objective: Having studied this class the student will be able to:
- describe what a computer network is;
- define the basic terminology;
- classify the networks according to the scale;
- describe what LAN, MAN, and WAN are;
- classify the networks according to the topology;
- identify the basic hardware used in networking computers;
- describe what Internet, Intranet, and Extranet.
4. Key questions of the theme:
1. Why do we need to connect computers?
2. What is a computer network?
3. What is the use of a modem?
4. What kind of network topologies do you know?
5. What is meant by Internet and Intranet? Why it is important to use Intranet than Internet?
5. The main forms / methods / technology of training to achieve the final learning outcomes discipline: Work in pairs, partial-search.
6. Types of control for assessing the level of achievement of the final learning outcomes of the discipline: individual task, oral survey.
References
1. Urmashev B.A. Information and communication technology: Textbook / B.A. Urmashev. – Almaty, 2016. - 410 p., ISBN 978-601-7940-02-7 (A textbook in English with the stamp of the Ministry of Education and Science of the Republic of Kazakhstan
2. Bond K., Langfield S. AQA Computing. - Cheltenham: Nelson Thomes Ltd. 2009. – 514 p.
3. Tanenbaum A., Wetherall D. Computer Networks, 5-th edition. – Prentice Hall. 2010. – 962 p.
8. Control:
Tasks
1. Make a glossary for the following terms:
bandwidth, bluetooth, client/server network, ethernet, fiber-optic cable, host computer, intranet, internet, IP address, local area network (LAN), mesh network, network, node, peer to peer, personal area network (PAN), protocol, ring network, star network, topology, twisted-pair wire, virtual private network (VPN), wide area network (WAN), wi-fi.
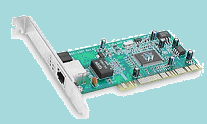
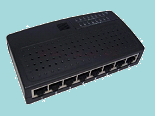
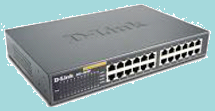
2. Label the photos with the network hardware in the table below.


1 ______________ 2 ___ Optical fiber __________ 3 ______________ 4 ______________
5 ___________________6____________________7___________________