

Семя – орган полового размножения и расселения растений: наружи у семян имеется плотный покров – кожура...
Кормораздатчик мобильный электрифицированный: схема и процесс работы устройства...
Семя – орган полового размножения и расселения растений: наружи у семян имеется плотный покров – кожура...
Кормораздатчик мобильный электрифицированный: схема и процесс работы устройства...
Топ:
Техника безопасности при работе на пароконвектомате: К обслуживанию пароконвектомата допускаются лица, прошедшие технический минимум по эксплуатации оборудования...
Теоретическая значимость работы: Описание теоретической значимости (ценности) результатов исследования должно присутствовать во введении...
Комплексной системы оценки состояния охраны труда на производственном объекте (КСОТ-П): Цели и задачи Комплексной системы оценки состояния охраны труда и определению факторов рисков по охране труда...
Интересное:
Лечение прогрессирующих форм рака: Одним из наиболее важных достижений экспериментальной химиотерапии опухолей, начатой в 60-х и реализованной в 70-х годах, является...
Мероприятия для защиты от морозного пучения грунтов: Инженерная защита от морозного (криогенного) пучения грунтов необходима для легких малоэтажных зданий и других сооружений...
Принципы управления денежными потоками: одним из методов контроля за состоянием денежной наличности является...
Дисциплины:
|
из
5.00
|
Заказать работу |
|
|
|
|
How do I start using Moodle?
5. The main forms / methods / technology of training to achieve the final learning outcomes discipline: Discussion.6. Types of control for assessing the level of achievement of the final learning outcomes of the discipline: individual task, oral survey
References
1. June J. Parsons and Dan Oja, New Perspectives on Computer Concepts 16th Edition - Comprehensive, Thomson Course Technology, a division of Thomson Learning, Inc Cambridge, MA, COPYRIGHT © 2014.
2. Shynybekov D.A., Uskenbayeva R.K., Serbin V.V., Duzbayev N.T., Moldagulova A.N., Duisebekova K.S., Satybaldiyeva R.Z., Hasanova G.I., Urmashev B.A. Information and communication technology. Textbook: in 2 parts. Part 1, 1st ed. - Almaty: IITU, 2017. - 588 p., ISBN 978-601-7911-03-4 (A textbook in English with the stamp of the Ministry of Education and Science of the Republic of Kazakhstan)
3. Vijay K. Vaishnavi, Vijay K. Vaishnavi, William Kuechler Design Science Research Methods and Patterns: Innovating Information and Communication Technology, 2nd Edition 2015 by CRC Press.
8. Control:
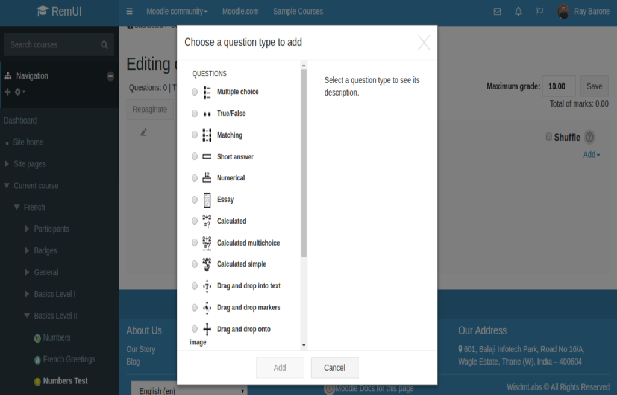
1. DemonstrationHow to Create a Quiz in Moodle in 3 Easy Steps
Quizzes in Moodle
In Moodle, a quiz is an activity. It can be added to a course or rather, a particular section within a course.
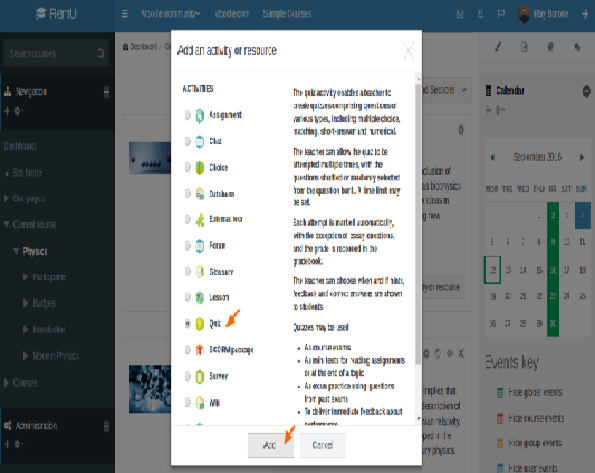
So to add a quiz, you need to start by creating a new activity.
Step #1 Add an Activity – Quiz
Since I’ve already covered activity creation in Moodle, I’ll summarize the points here:
1. Head over to courses
2. Select a course
3. Turn Editing On
4. Add an Activity – in this case – Quiz.
Step #2 Customize Quiz Settings
Each quiz in Moodle provides you settings you can personalize as per your preference. The only mandatory field while creating a quiz – is the quiz name.
Let’s take a look at other important settings:
· Timing: The options present here, help you schedule a quiz at a particular time. A student can attempt a quiz in between the open and close quiz times. If you set a time limit for a quiz, it comes into play when a student attempts a quiz. If the time runs out the quiz is automatically submitted.
· Grade: Grade settings help you set passing parameters for a quiz.
· Attempts allowed: By default, a student has ‘Unlimited’ attempts for a quiz. You can set this to ‘1’ for quizzes that can be attempted only once, or to a prefered limit. The ‘Grading method’ field decides how you calculate the final grade, when a student has multiple attempts.
· Grade to pass: With this option you can set a passing grade for the quiz and conditional access to further course content based on quiz completion status (Activity Completion and Conditional activities).
· Question behavior: This controls feedback you offer to students during a quiz. The most popular options are
· Differed Feedback: feedback is offered only upon quiz completion
· Immediate Feedback: the feedback is offered after each question
|
|
· Interactive Feedback: where hints can be given and the student has the option to re-attempt the question
· Certainty-based marking: when clubbed with CBM, along with the student’s answer, he/she is required to rate the certainty of the answer attempted being right; points are awarded accordingly
· Overall feedback: The feedback that has to be shown at the end of the quiz, should be added here.
· Activity completion: You can restrict access to course activities using this option.
Step #3 Add Quiz Questions
The final step is to add quiz questions.
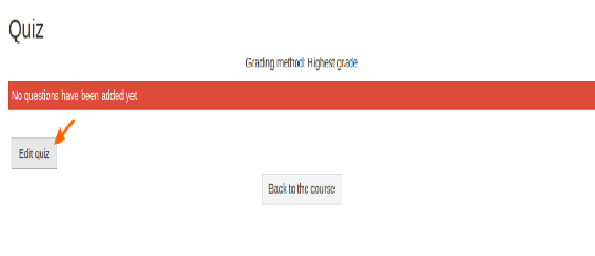
To add questions to a quiz, you need to edit the quiz and select ‘+ a new question’ to create new questions. Once you have a question pool ready, you could add a question from the question bank for subsequent quizzes.
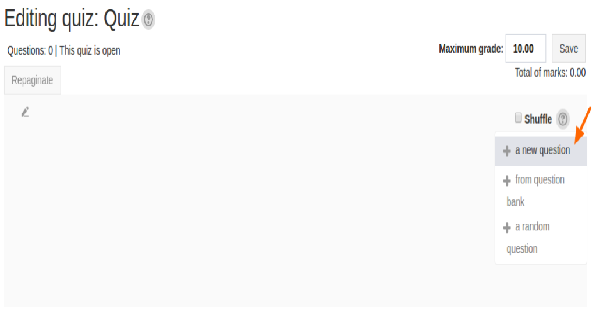
Moodle provides 15 question types – ranging from simple true/false, multiple choice, select missing word questions, to advanced questions such as random short-answer matching- that you can include in your quiz.
For each question, make sure you add:
· Question name: A unique identifier for the question
· Question text: The actual quiz question. You could add an elaborate question with multimedia content, if needed.
· Default mark: The points awarded for the right answer
Optionally you could add:
· Category: With a category, you can classify question types. This could be by difficulty level or by course category.
· One or multiple answers?: For question types which have multiple answers, you can use this option to set more than a single choice as the right answer.
· Combined feedback: Apart from providing feedback for individual answers, you can use this field to provide combined feedback for the question.
· Tags: Along with categories, tags can be used to classify question types.
Once you create the quiz, your students can now attempt it as part of a course.
Wrapping Up
Quizzes help challenge students and motivate them to study. Along with tracking user progress, quizzes are used to add gamification in learning.
In Moodle, a quiz can be added to course content, to evaluate students or as course pre-requisite. The flexibility of creating a question bank helps speed up quiz creation.
2. Create test questions for ICT using the Moodle program (50-100)
3. Answer key questions.
Class 15
1. The theme: Installation and use of application programs in the professional sphere. Working in the Matlab environment for scientific and technical computing. Working with the Matlab toolboxes for applied problem solving.
2. The aim: The aims of this class are to provide a knowledge and skills in performing calculations on the enter data using formulas in STATISTICA 10, to give the basic ideas about charts.
3. The learning objective: Having studied this class the student will be able to:
- insert formulas by using arithmetic operations with contents of the cells;
- format the cells and the contents;
- create charts for given data set;
- customize the features of charts.
4 Key questions of the theme:
1. What are the advantages of using computerized Spreadsheets?
2. What kind of documents you can create in the STATISTICA? Which extensions are these documents?
3. What operations can be performed with the columns and rows of a spreadsheet?
4. How to create a formulas in the spreadsheet?
|
|
5. How to create a charts in the STATISTICA?
6. What kind of charts in the STATISTICA do you know?
5. The main forms / methods / technology of training to achieve the final learning outcomes discipline: Computer based teaching.
6. Types of control for assessing the level of achievement of the final learning outcomes of the discipline: individual task, oral survey.
References
1. June J. Parsons and Dan Oja, New Perspectives on Computer Concepts 16th Edition - Comprehensive, Thomson Course Technology, a division of Thomson Learning, Inc Cambridge, MA, COPYRIGHT © 2014.
2. Shynybekov D.A., Uskenbayeva R.K., Serbin V.V., Duzbayev N.T., Moldagulova A.N., Duisebekova K.S., Satybaldiyeva R.Z., Hasanova G.I., Urmashev B.A. Information and communication technology. Textbook: in 2 parts. Part 1, 1st ed. - Almaty: IITU, 2017. - 588 p., ISBN 978-601-7911-03-4 (A textbook in English with the stamp of the Ministry of Education and Science of the Republic of Kazakhstan)
3. Vijay K. Vaishnavi, Vijay K. Vaishnavi, William Kuechler Design Science Research Methods and Patterns: Innovating Information and Communication Technology, 2nd Edition 2015 by CRC Press.
8. Control:
1. Practical task. Spreadsheet formula. (5-10)
1. Start STATISTICA 10.
2. Create a new document: Home →File →New→Spreadsheet.
3. Create the table (6 variables by 15 cases).
4. Type the titleof the table “ Blood pressure ” in the white box below the line: «Data: Spreadsheet1 (6v by 15c)» (figure 1).
5. Double-click on the Var1. The Variable specification dialog will be displayed.In the Name field type “ The upper limit of blood pressure before taking the drug ”. Click the  button to move to the next column. In the Name fieldtype “ The upper limit of blood pressure after taking the dru g”. Click the button. In the Name field type “ Difference ”. Click the button. In the Name field type “ The lower limit of blood pressure before taking the drug ”. Click the button. In the Name fieldtype “ The lower limit of blood pressure after taking the drug ”. Click the button. In the Name fieldtype “ Difference ” (figure 1).
6. Enter the data shown in figure 1.

Figure 1.
7. Double-click on the variable name Difference in the third column.In the Long name fieldat the bottom of the dialog, enter the formula: = v2-v1 and click the OK button(figure 2).
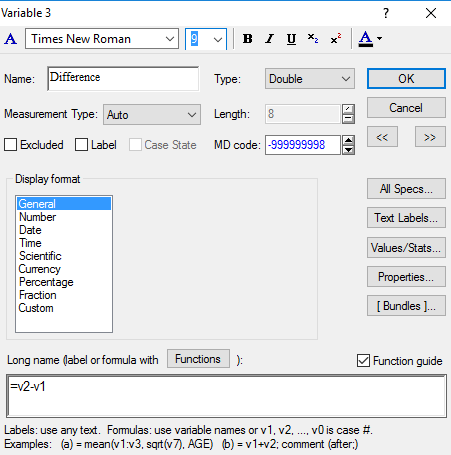
Figure 2.
A dialog will be displayed that informs you whether the formula is formally correct. Click the Yes button to proceed.
Double-click on the variable name Difference in the sixth column. In the Long name fieldenter the formula: = v5-v4 and click the OK button. Click the Yes button to proceed.
8. Save the file: Home → File → Save → Save As “ Blood pressure.sta ”.
2. Practical task. Spreadsheet formula. (5-10)
1. Start STATISTICA 10.
2. Open the Adstudy.sta data file.
3. Create a new variable that is the mean of variables 3 through 25. Double‐click on the first blank variable header (after variable 25).
4. The Add Cases and/or Variables dialog will be displayed. Click the OK button to accept the default, which is to add one variable.
5. The Variable specification dialog for the new variable will be displayed. In the Display format group, select Number. In the Long name field at the bottom of the dialog, enter: =mean(v3:v25) (figure 3).
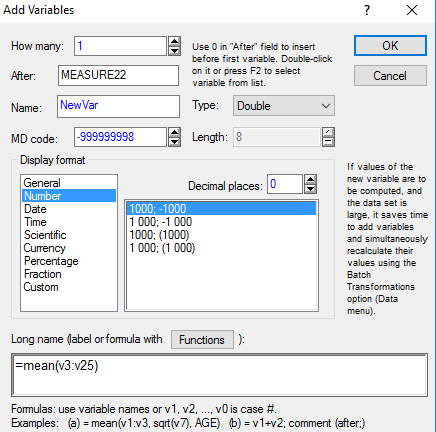
Figure 3.
Click the OK button. Click the Yes button to proceed. The new variable is now filled with the mean of variables 3 through 25 for each case.
6. Сlose the Adstudy.sta file, doesn’t save changes.
3. Practical task. Batch formulas.
|
|
1. Start STATISTICA 10.
2. Open the Characteristics.sta data file. This data file contains information about patients in a study. For this example 1) calculate patient Body Mass Index (BMI) and 2) convert height to centimeters (cm), and add these two variables to the data set.
3. On the Data tab, in the Transformations group, click Transforms to display the Batch Transformation Formulas dialog (figure 4).
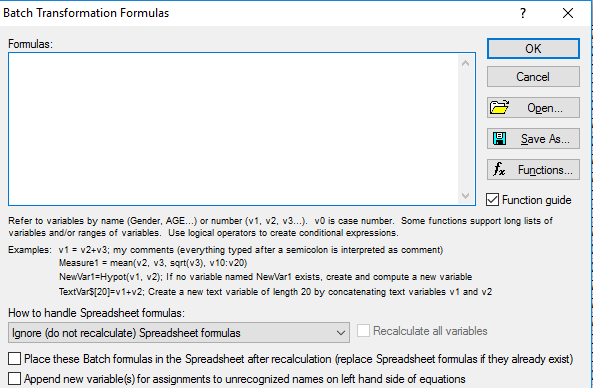
Figure 4.
4. In the Formulas field, enter the list of transformation formulas to be applied to the active data spreadsheet:
BMI=('weight (lb)' / 'Height (in)' **2)*703
'Height (cm)' = 'height (in)' *2.54
Separate each transformation formula by a return (press Enter on keyboard) (figure 5).

Figure 5.
5. Click the OK button in the Batch Transformation Formulas dialog. The Add New Variables? will be displayed; click the Yes button to add the two new variables to the Characteristics.sta data file. A message will be displayed to information whether the expressions you entered in the Batch Transformation Formulas dialog are correct. If they are OK, click Yes to proceed. STATISTICA calculates the formulas and adds the two variables, BMI and Height (cm), to the spreadsheet.
6. Сlose the Characteristics.sta file, doesn’t save changes.
4. Practical task. Input data directly from Excel.
1. Start STATISTICA 10.
2. On the STATISTICA Home tab, in the File group, click the Open arrow and select Open Examples from the drop‐down menu to display the Open a STATISTICA Data File dialog.
3. From the Files of type drop-down list at the bottom of the dialog, select Excel Files (*.xls, *xlsx, *xlsm). Double-click the Datasets folder, and then select the Weather report data file, which is an Excel file. Click the Open, and the Opening file dialog will be displayed.
4. Click the Open as an Excel Workbook button, and the Excel file will be displayed. Note that when an Excel worksheet is opened in STATISTICA, the Excel and STATISTICA menus merge, enabling you to access key functionality for both applications.
5. From the Statistics menu, select Basic Statistics/Tables.The Select Excel Range for the Analysis dialog will be displayed. Click the OK button in the Select Excel Range for the Analysis dialog to accept the defaults; the dialog will close, and the Review/Edit Column Types dialog will be displayed. Click OK button.
6. Startup Panel is displayed. Select Descriptive Statistics analysis.Click OK button. The analysis specification dialog will be displayed (figure 6).
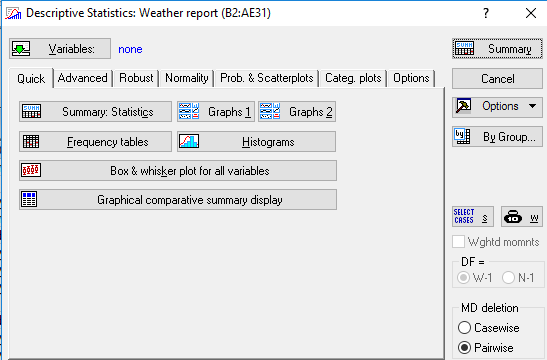
Figure 6.
7.Click the Variables button, and in the variable selection dialog, select Temperature. Click OK in the variable selection dialog to return to the Descriptive Statistics dialog.
8.Click Summary button. The result table will be displayed (figure 7).

Figure 7.
9. Save the file as Weather report.stw.
6. Practical task. Filter Duplicate Cases.
1. Start STATISTICA 10.
2. Open the Duplicates.sta data file. Notice that is 10v by 60c (10 variables by 60 cases).
3. On the Data tab, in the Transformations group, click Filter/Record menu, select Filter Duplicate Cases to display the Filter Duplicate Cases dialog. In the Input group box, the Variables option is used to specify the basis of distinction for duplicates. Click the Variables button, and in the variable selection dialog, select Respondent so that all respondents will be checked for duplicates. Click OK in the variable selection dialog to return to the Filter Duplicate Cases dialog (figure 8).
|
|
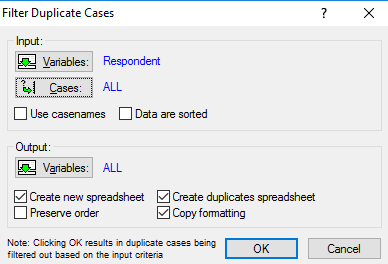
Figure 8.
4. In the Input group box, verify that all cases are selected.
5. In the Output group box, verify that all variables are selected.
6. Verify that the Create new spreadsheet check box is selected (the default), and select the Create duplicates spreadsheet check box.
7. Leave the last two options at their defaults: the Preserve order check box is cleared, and the Copy formatting check box is selected. Click OK.
8. Two new spreadsheets will be generated. One of the spreadsheets is 10v by 51c and contains the respondents from the original spreadsheet excluding the duplications. The other spreadsheet is 10v by 9c and contains the duplicate respondents that were extracted from the original spreadsheet.
9. Close the file, doesn’t save changes.
7. Practical task.Creating Subsets.
1. Start STATISTICA 10.
2. Open Boston2.sta data file. This data set contains over a thousand cases. We want to extract housing tracts with low median prices.
3. Select the Data tab, and in the Manage group, click Subset to display the Create a Subset dialog (figure 9).
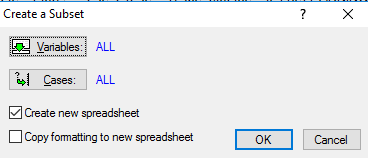
Figure 9.
3. Click the Cases button to display the Spreadsheet Case Selection Conditions dialog, which contains options to create conditions to define the selection of cases to be considered for the sample.
4. Select the Enable Selection Conditions check box to activate the options, and then select the Specific, selected by option button in the Includecases group box to specify which cases to include in the analysis. Type v1=’LOW’ in the Expression text box.
5. Click the OK button to set the selection conditions and return to the Create a Subset dialog, and click the OK button in this dialog to create the new spreadsheet. The resultant spreadsheet contains 334 cases and all 15 variables from the original spreadsheet. For the Price variable, all cases have a value of LOW.
6. Close the file, doesn’t save changes.
8. Practical task. Creating charts.
1. Start STATISTICA 10.
2.Create a new document: Home →File →New→Spreadsheet.
3. Create the table (1v by 7c).
4. Type the titleof the table “ Mortality from cancer among the population of the CIS countries, 2013 y. ”
5. Rename the rows in the CIS countries names. Enter the data, as shown in figure 10.
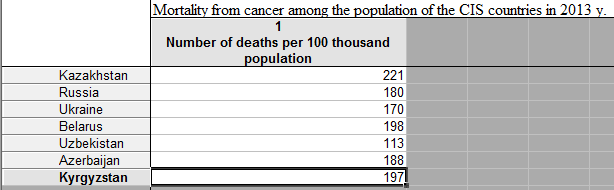
Figure 10.
6. Click the Graphs tab on the Ribbon. Click the 2D button in the More… group, and select Pie Charts from the drop-down list.
7. The Pie Charts dialog will be displayed, click Advanced tab.
8. Click the Variables buttonand in the variable selection dialog, selectname of the variable. Click OK in the variable selection dialog to return to the Pie Charts dialog.
9. Choosethe Pie Charts – Values graph type.
10. Click the Spreadsheet button and choose Case names.
11.Choose Text and Percent in the Pie legend window.
12. Click OK button. The Pie Chart will appear (figure 11).
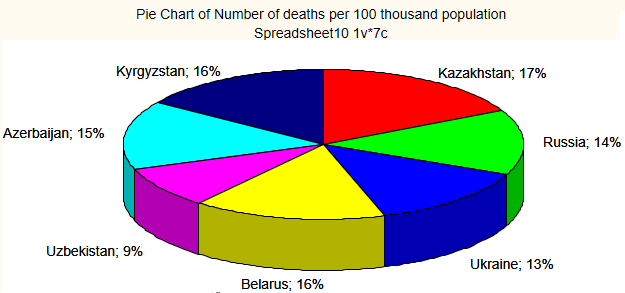
Figure 11.
13. Double click on the Pie Chart. Change the Outside Background color, Inside Background color, Font size of title, Explode distance (figure 12).
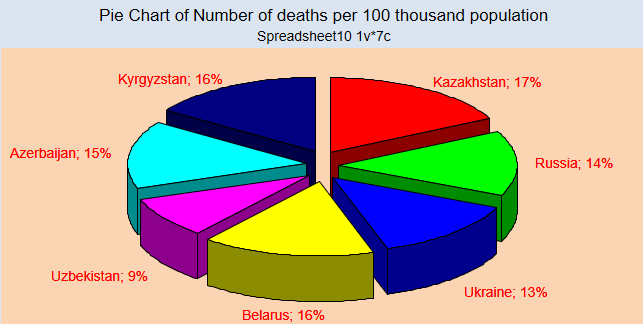
Figure 12.
14. Click the Graphs tab on the Ribbon. Click the 2D button in the More… group, and select Bar/Column Plots from the drop-down list.
15. The Bar/Column Plots dialog will be displayed, click Advanced tab.
16. Click the Variables button,and in the variable selection dialog, selectname of the variable. Click OK in the variable selection dialog to return to the Bar/Column Plots dialog.
17.Choosethe Regular graph type. Choose the Vertical orientation.Click OK button.The Bar/Column Plot will appear (figure 13).
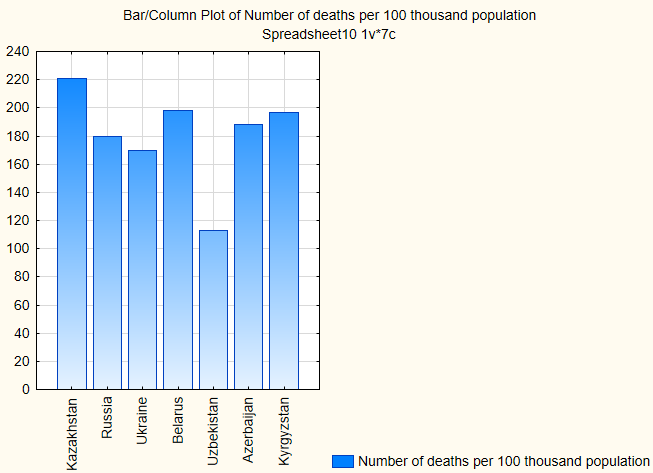
Figure 13.
18. Save the workbook: Home → File → Save → Save As “ Chart.stw ”.
9. Practical task. Creating charts.
Using the data given below create the Bar/Column Plot “ Number of hospitals in the Republic of Kazakhstan, 2015 y. ”
|
|
Republic of Kazakhstan
901
Akmolinskaya
38
Aktyubinskaya
47
Almatinskaya
86
Atyrauskaya
36
East Kazakhstan
88
Zhambylskaya
57
West Kazakhstan
37
Karagandinskaya
83
Kostanayskaya
51
Kyzylordinskaya
50
Mangistauskaya
29
Pavlodarskaya
42
North Kazakhstan
28
South Kazakhstan
122
Astana
31
Almaty
76
10. Practical task. Creating charts.
Using the data given below create the Pie Chart “Sickness rate of active tuberculosis on age groups, 2015 y.”
| 0-14 | 15-17 | 18-34 | 35-54 | 55-64 |
65 and elder |
| 4 | 5 | 44 | 32 | 9 | 5 |
11. Answer key questions.
|
|
|

Таксономические единицы (категории) растений: Каждая система классификации состоит из определённых соподчиненных друг другу...

Наброски и зарисовки растений, плодов, цветов: Освоить конструктивное построение структуры дерева через зарисовки отдельных деревьев, группы деревьев...

История развития хранилищ для нефти: Первые склады нефти появились в XVII веке. Они представляли собой землянные ямы-амбара глубиной 4…5 м...
Адаптации растений и животных к жизни в горах: Большое значение для жизни организмов в горах имеют степень расчленения, крутизна и экспозиционные различия склонов...
© cyberpedia.su 2017-2024 - Не является автором материалов. Исключительное право сохранено за автором текста.
Если вы не хотите, чтобы данный материал был у нас на сайте, перейдите по ссылке: Нарушение авторских прав. Мы поможем в написании вашей работы!