Getting Started
The following guide will take you through the first few steps of downloading and using Offline Explorer Enterprise. This usually only takes a few minutes.
Before you can start using the program, you will need to download and install it. If you have already downloaded Offline Explorer Enterprise, you can skip this step.
If you have not already downloaded the program, you can download Offline Explorer Enterprise here: http://www.metaproducts.com/download/eesetup.exe
Once the download is complete, the installer will appear. You can then follow the steps in the installer to complete the installation of Offline Explorer Enterprise.
Run Offline Explorer Enterprise in your Windows Start menu.
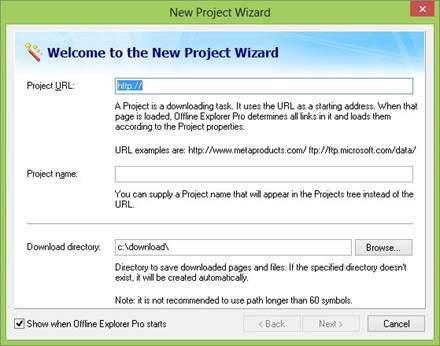
Once the program is running, the New Project Wizard screen will appear. Here you can determine what and how you want to download; however, you can change these settings to meet your needs at any time.
The following steps will help you to begin a New Project:
In the Project URL box, enter the starting web address (URL) of the web content or site you wish to download.
The Project name is automatically saved as the title of the Web page by default, but it can be changed at any time to whatever you like by typing in a new Project name.
Choose the Download directory. This is where your downloaded files will be stored. By default, Offline Explorer Enterprise places all downloaded Websites into the following folder: c:download directory.
To change the Download directory, click Browse and select where you would like Offline Explorer Enterprise to save your downloaded Web content.
Click Next.
In the Levels limit box, select the number of levels you would like to download. This value determines how many levels deep from the starting URL a download should go. If you only need the first page and the images on it, set Levels limit to 0. To download all pages linked to the first page, set the Levels limit to 1.
Click Next.
Select the file types that you would like to exclude from the download. If you need all file types, chose Download all files that are linked to the starting page.
If you decide to exclude certain types of files (Graphics, Video, Audio or Archive), check those that you would like to exclude and select Skip loading the following file types.
File types with a check mark will be excluded, while files without a check mark will be included.
Click Next.
Select a Download location.
If you want to download web pages only within the starting URL, select "Load only within the starting URL."
If you do not want to load from other servers linked to the starting URL, select "Load only from the starting server."
If you want to download content from all linked sites, select "Load from any location."
If you need all images, select "Load images from any location."
Click Next.
To begin the download, select Download the new Project now. To begin the download later, select Download the Project later.
If you need to fine-tune or adjust your download settings, select Setup advanced properties.
Click Next.
The Project you created will be added to the Project tree on the left side of the Offline Explorer Enterprise screen. Once the program starts downloading, you can watch all processes in the Download Progress toolbar. The Status Bar displays the number of downloaded files and the number of the files waiting to be downloaded.
Once your downloading is complete, a Download complete message will appear in the notification area on the screen within the Download Progress toolbar and you can now begin browsing the Website offline. To begin browsing, select the Project you downloaded in the Project tree and click Browse on the Ribbon. Offline Explorer Enterprise will open the downloaded Website in the Internal Browser.
Начало работы
Следующее руководство проведет вас через первые несколько шагов загрузки и использования автономного проводника. Обычно это занимает всего несколько минут.
Запустите автономный проводник Enterprise в меню «Пуск» Windows.
После запуска программы появится экран «Новый проект». Здесь вы можете определить, что и как вы хотите скачать; однако вы можете изменить эти параметры в соответствии с вашими потребностями в любое время.
Следующие шаги помогут вам начать новый проект:
• Шаг 1
В окне Ограничения уровней выберите количество уровней, которые вы хотите загрузить. Это значение определяет, сколько уровней в глубине от начального URL-адреса загружается. Если вам нужна только первая страница и изображения на ней, установите для параметра Лимиты значение 0. Чтобы загрузить все страницы, связанные с первой страницей, установите для Уровня ограничение значение 1.
Нажмите "Далее.
• Шаг 4
Если вы хотите загружать веб-страницы только в исходном URL-адресе, выберите «Загружать только в начальный URL-адрес». Если вы не хотите загружаться с других серверов, связанных с исходным URL-адресом, выберите «Загрузить только с исходного сервера». Если вы хотите загрузить контент со всех связанных сайтов, выберите «Загрузить из любого места». Если вам нужны все изображения, выберите «Загрузить изображения из любого места». Нажмите «Далее».
• Шаг 6
Созданный проект будет добавлен в дерево проекта в левой части экрана автономного проводника. Как только программа начнет загружаться, вы можете просмотреть все процессы на панели инструментов «Прогресс». Строка состояния отображает количество загруженных файлов и количество файлов, ожидающих загрузки.
После завершения загрузки в области уведомлений на панели инструментов «Загрузить прогресс» появится сообщение «Загрузка завершено», и теперь вы можете начать просмотр веб-сайта в автономном режиме. Чтобы начать просмотр, выберите проект, который вы загрузили в дереве проекта, и нажмите «Обзор на ленте». Offline Explorer Enterprise откроет загруженный веб-сайт во внутреннем браузере.
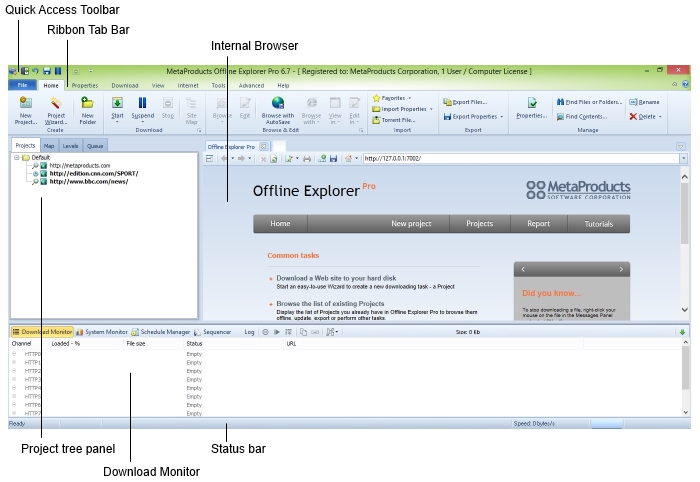
The default workspace
The default Offline Explorer Pro workspace includes the following main parts:
- Quick Access Toolbar
- Ribbons Tab Bar
- Internal Browser
- Project Tree panel
- Download Monitor
- Status Bar
Manipulate the workspace
You can manipulate the default workspace to make it convenient for your needs. For example, you can display or hide Ribbon, Internal Browser, Project Tree panel, Download Monitor, and Status Bar as you need them to keep your workspace convenient and clean. In addition, you can change the layout of the workspace.
To display or hide Ribbon, do the following:
Click the Collapse/Expand arrow, to hide or display the Ribbon.
To display or hide Internal Browser, do the following:
On the Ribbon, click the View tab, and then click Internal Browser.
To display or hide Project tree, do the following:
On the Ribbon, click the View tab, and then click Projects.
To display or hide Download Monitor, do the following:
On the Ribbon, click the View tab, and then click Download Monitor.
The Quick Access Toolbar
The Quick Access Toolbar is located along the top of the workspace.
You can place it below the Ribbon by clicking More Commands and selecting the Show the Quick Access Toolbar Below the Ribbon command.
Selecting More Commands enables you to add other tools to which you want quick access.

Панель быстрого доступа
Панель быстрого доступа расположена в верхней части рабочей области.
Вы можете разместить его под лентой, нажав «Больше команд» и выбрав «Показать панель быстрого доступа» под командой «Лента».
Выбор дополнительных команд позволяет добавлять другие инструменты, к которым требуется быстрый доступ.
Кнопки панели быстрого доступа
Exit - закрывает автономный проводник Pro.
Восстановление удаленных проектов или папок - Восстанавливает последний удаленный проект или папку.
Сохраните изменения, внесенные в «Параметры» или «Проекты». - Сохраняет последние настроенные настройки.
Полная загрузка текущих файлов и временное приостановление других URL-адресов. При приостановке загрузки загрузка файлов не будет остановлена немедленно. Программа завершит загрузку текущих файлов до ее паузы.
Прекратить загрузку выбранного проекта - Останавливает загрузку выбранного проекта. Когда вы перезагружаете загрузку проекта, все файлы будут загружаться с самого начала.
Настройка панели быстрого доступа. - Отображает все параметры, доступные на панели быстрого доступа. Позволяет добавлять другие параметры на панель быстрого доступа, размещать панель быстрого доступа над панелью вкладок ленты или ниже, а также скрывать панель вкладок ленты.
The Ribbon Tab Bar
- About the Ribbon and the Tab
- Working withTabs
About the Ribbon and the Tab
The Offline Explorer Pro workspace is designed around the ribbon interface.
The two main components of the ribbon interface are the Ribbon and the Tab. Tabs are used to switch between ribbons and organize controls on the ribbons.
Stored on the Ribbon are controls: buttons to perform actions and drop-down menus to choose options. Related controls are organized on the Ribbon in groups.

Depending upon the size of the monitor you are using, the controls may be stacked or minimized on the Ribbon as shown on the image.
Many dialog boxes can be opened directly from Ribbon by using controls or dialog box launchers (small arrows on the bottom of the specific ribbon group).
Working with tabs
The Ribbon Tab Bar holds the File, Home, Properties, Download, Browser, and Worlspace tabs. Clicking on a tab selects the tab and displays the corresponding ribbon with its controls.
The Home tab is always selected when the program opens. Only one tab can be selected at a time. You can easily switch between tabs to work with different commands on the ribbon.
Панель вкладок ленты
• О ленте и вкладке
• Работа с TabsAbout лентой и вкладкой.
Работа с вкладками В панели вкладок Ribbon хранятся вкладки «Файл», «Главная», «Свойства», «Загрузить», «Браузер» и «Уорлспространство». Нажатие на вкладку выбирает вкладку и отображает соответствующую ленту с ее элементами управления.
Когда открывается программа, вкладка «Главная» всегда выбирается. За один раз можно выбрать только одну вкладку. Вы можете легко переключаться между вкладками для работы с различными командами на ленте.
The File Tab
Clicking the File Tab displays Backstage view. Backstage view takes over the whole screen and is organized in 3 panels. The left panel includes tabs to switch between available options. These include: Project Wizard, New, Information, Help, Options, Manage Templates, Save Changes, and Exit. The center panel offers related options.
The New tab is always selected when you open Backstage View.
Backstage view buttons
| Tab
| Function
|
| Project Wizard
| Opens the New Project Wizard dialog box to create a new Project.
|
| New
| Provides quick access to creating New Project or Folder options.
Following are the options available to create a new Project:
Project Properties dialog box, Folder Properties dialog box, New project Wizard dialog box, download Project Properties from a text file, or create new Project from a BitTorrent file.
To create a new Project, click the one of the available options in the center panel of the Backstage view, and then click Create in the right panel.
|
| Information
| Provides quick access to the information regarding the selected Project.
|
| Help
| Provides quick access to the program Help and User Forum. Enables you to get support, report a problem, find program Release Notes and License Agreement.
|
| Options
| Opens the Options dialog box.
|
| Manage Templates
| Opens the Templates Editor dialog box.
|
| Save changes
| Saves any last changes you have made to the program general preferences, Project properties, Download settings, and settings available in Offline Explorer Pro.
|
| Exit
| Closes the program.
|
Вкладка «Файл File Tab»
Clicking отображается представление Backstage. Backstage view берет на себя весь экран и организован в 3 панели. Левая панель включает вкладки для переключения между доступными параметрами. К ним относятся: мастер проекта, новый, информация, справка, параметры, управление шаблонами, сохранение изменений и выход. Центральная панель предлагает соответствующие параметры.
Ниже приведены параметры, доступные для создания нового диалогового окна «Проект: проект», диалогового окна «Свойства папки», диалогового окна «Мастер создания проекта», загрузки «Свойства проекта» из текстового файла или создания нового проекта из файла BitTorrent.
Справка Предоставляет быстрый доступ к справочной системе и форуму пользователя. Позволяет получить поддержку, сообщить о проблеме, найти заметки о выпуске программы и лицензионное соглашение.
Выход Закрывает программу.
The Home Tab
Clicking the Home Tab displays the Home Ribbon. Buttons on the Home Ribbon are organized in six groups:
- Home Ribbon Create group
- Home Ribbon Download group
- Home Ribbon Browse and Edit group
- Home Ribbon Import group
- Home Ribbon Export group
- Home Ribbon Manage group

| Button
| Function
| |
| New Folder
| Opens the Folder Properties dialog box.
| |
| New Project
| Opens the Project Properties dialog box.
| |
| Project Wizard
| Opens the New Project Wizard.
| |
| | |
| Start
| Starts downloading the selected Project.
|
| Suspend
| When you suspend a download, the downloading of files will not be stopped immediately. The program will complete the downloading of the current files before it pauses. After you suspend a download, you can resume the download by clicking Suspendonce again.
|
| Stop
| Stops downloading the selected Project immediately. When you restart the downloading of a Project, all of the files will be downloaded from the very beginning.
|
| | |
| Browse
| Allows to browse files downloaded for the selected Project in the Internal Browser. If the Project contains multiple starting URLs, you may click the lower part of the Browse button to choose among several starting URLs.
|
| Edit
| Opens files downloaded for the selected Project in HTML format in the Internal Browser.
|
| Browse with AutoSave
| Saves web pages as you browse the downloaded website, if those web pages were not saved in the previous download session.
|
| Browse with
| Lists web browsers to view the downloaded content in.
|
| | |
| Favorites
| Displays the bookmarks from the web browsers installed on your computer.
|
| Import Properties
| Allows creating a New Project with one of the following:
the starting URL copied to clipboard and the Properties from the selected Templates,
or the Properties saved as a text file.
|
| Torrent File
| Opens the Bit Torrent file dialog box.
|
| | | |
| Export Files
| Opens the Export Project dialog box for the selected Project.
| |
| Export Properties
| Allows to do the following with the properties of the selected Project:
copy to clipboard,
save as a text file,
or publish to the MetaProducts website.
| |
| | |
| Properties
| Displays the Project Properties dialog box for the selected Project.
|
| Find Files or Folders
| Enables you to find a Project. You can specify the following as keywords to search: project or Folder names, URLs or descriptions in the Project tree.
|
| Find Contents
| Opens the Find Contents window.
|
| Rename
| Enables you to edit the name of the selected Project or Folder.
|
| Delete
| Enables you to delete the selected Folder, Project with its properties and downloaded files, or properties and downloaded files of a Project separately.
|
Вкладка Home Tab
Home Tab отображает главная лента. Кнопки на главной ленте организованы в шесть групп:
• Главная лента Создать группу
• Главная лента Загрузить группу
• Главная лента Обзор и редактирование группы
• Главная лента группа импорта
• Группа экспорта
• Главная лента Управление группой
Suspend При приостановке загрузки загрузка файлов не будет немедленно прекращена. Программа завершит загрузку текущих файлов до ее паузы. После приостановки загрузки вы можете возобновить загрузку, нажав «Приостановить» еще раз.
Browse Позволяет просматривать файлы, загруженные для выбранного проекта во внутреннем браузере. Если проект содержит несколько стартовых URL-адресов, вы можете щелкнуть нижнюю часть кнопки «Обзор», чтобы выбрать один из нескольких стартовых URL-адресов.
The Properties Tab
Clicking the Properties Tab displays the Properties Ribbon. Buttons on the Properties Ribbon are organized in five groups:
- Properties Ribbon File Filters group
- Properties Ribbon URL Filters group
- Properties Ribbon Content group
- Properties Ribbon Advanced Settings group
- Properties Ribbon Information group
| | |
| Pages/Text
| When the Pages/Text button is unchecked, no text file will be saved for the selected Project.
|
| Images
| When the Images button is unchecked, no image files will be downloaded for the selected Project.
|
| Video
| When the Video button is unchecked, no video files will be downloaded for the selected Project.
|
| Audio
| When the Audio button is unchecked, no audio files will be downloaded for the selected Project.
|
| Archive
| When the Archive button is unchecked, no archive files will be downloaded for the selected Project.
|
| Other
| When the Other button is unchecked, the files types that are not listed in other categories of the Files Filter Group will not be downloaded for the selected Project.
|
| User defined
| When the User Defined button is unchecked, no Java Scripts, Styles, or Flash files will be downloaded for the selected Project.
|
| | |
| Protocols
| Opens the Project Properties dialog box, Protocols section for the selected Project.
|
| Servers
| Opens the Project Properties dialog box, Servers section for the selected Project.
|
| Directories
| Opens the Project Properties window, Directories section for the selected Project.
|
| Filenames
| Opens the Project Properties dialog box, Filenames section for the selected Project.
|
| | |
| Content Filters
| Opens the Project Properties dialog box, Content Filters section for the selected Project.
|
| | |
| Limits
| Opens the Project Properties window, Download Limits section for the selected Project.
|
| Parsing
| Opens the Project Properties window, Parsing section for the selected Project.
|
| Links Translation
| Enables you to switch between the available modes of converting links to filesystem paths.
|
| Scheduler
| Opens the Project Properties window, Scheduling section for the selected Project.
|
| Password
| Opens the Project Properties window, Passwords section for the selected Project.
|
| File Copies
| Opens the Project Properties window, File Copies section of the selected Project.
|
| | |
| Statistics
| Displays the Download Statistics dialog box.
|
| Summary
| Displays the Properties Summary dialog box.
|
Вкладка Свойства
Отображается лента свойств. Кнопки в ленте свойств организованы в пять групп:
• Свойства группы фильтров файлов ленты
• Свойства группы фильтров URL-адресов ленты
• Свойства Группа содержимого ленты
• Свойства Группа расширенных настроек ленты
• Свойства Лента Информация Группа Страницы / Текст
Планировщик Открывает окно «Свойства проекта», раздел «Планирование» для выбранного проекта.
The Download Tab
Clicking the Download Tab displays the Download Ribbon. Buttons on the Download Ribbon are organized in six groups:
- Download Ribbon Start group
- Download Ribbon Stop group
- Download Ribbon Restart & Update group
- Download Ribbon Site Map group
- Download Ribbon Suspend & Resume group
- Download Ribbon Recent Downloads group
| | |
| Start
| Starts downloading the selected Project or all Projects for the selected Folder.
|
| Start All
| Starts downloading all Projects.
|
| | |
| Stop
| Stops downloading the selected Project immediately. When you restart the downloading of a Project, the files will be downloaded from the very beginning.
|
| Stop All
| Stops downloading all Projects downloaded at the moment.
|
| | |
| Restart Downloads
| Starts the downloading of the selected Project(s) from the very beginning.
|
| Update Pages
| When repeating downloading of the selected Project, downloads only new or modified files.
|
| Download missing files
| When repeating downloading of the selected Project(s), searches for the missed links and tries to download those links.
|
Вкладка Download
Download отображается вкладка «Загрузить ленту». Кнопки на ленте загрузки организованы в шесть групп:
• Загрузите Start group
• Загрузите Stop group
• Загрузите группу ретрансляции и обновления
• Загрузите Site Map group
• Загрузите «Подвеска и резюме»
• Загрузите последних загрузок
Диалоговое окно «Редактор шаблонов» Позволяет создавать новые проекты из диалогового окна «Шаблоны». Позволяет просматривать и изменять настройки для управления подключением к Интернету и общим ссылкам на программы.
New Project Wizard
- About the New Project Wizard
- Accessing the New Project Wizard dialod box
About New Project Wizard
The purpose of the New Project Wizard dialog box is to create a new Project with just few steps. We recommend using the New Project Wizard, if you are creating the Project for the first time.
The New Project Wizard dialog box appears each time you start Offline Explorer Pro. If you do not want the New Project Wizard to appear each time you start a program, click the Show when Offline Explorer Pro starts box on the first page of the New Project Wizard to clear.
Мастер создания проекта
• О мастере создания нового проекта
• Доступ к макетному диалоговому окну мастера проекта. Новый мастер проекта. Цель диалогового окна «Мастер создания проекта» - создать новый проект всего за несколько шагов. Мы рекомендуем использовать мастер создания проекта, если вы создаете проект в первый раз.
Диалоговое окно New Project Wizard появляется при каждом запуске Offline Explorer Pro. Если вы не хотите, чтобы мастер создания проекта появлялся каждый раз при запуске программы, нажмите кнопку «Показать», когда «Автозапуск Проводника Про» запускается на первой странице мастера создания проекта, чтобы очистить.
Templates Editor dialog box
- About Templates Editor dialog box
- Accessing the Templates Editor dialog box
Options dialog box
- About Options dialog box
- Accessing the Options dialog box
About Options dialog box
The Options dialog box supports the following tasks: viewing and changing Internet connection, download speed, and Proxy settings, setting program general preferences, selecting external browsers, editors, and viewers.
Export dialog box
- About Export dialog box
- Accessing the Export dialog box
About Export dialog box
The Export dialog box supports the following tasks: copying downloaded files to a different directory on your computer or a removable storage device, converting downloaded files to different files formats, uploading doanloaded files to FTP servers.
Диалоговое окно «Параметры»
диалоговое окно «Параметры» поддерживает следующие задачи: просмотр и изменение подключения к Интернету, скорости загрузки и настроек прокси, настройка общих настроек программы, выбор внешних браузеров, редакторов и зрителей.
Доступ к диалоговому окну «Параметры» Чтобы открыть диалоговое окно «Параметры», выполните следующие действия:
• На панели «Дерево проектов» выберите нужный проект.
• На ленте выберите вкладку «Файл». Появится представление Backstage.
• На левой панели выберите Функции.
Загрузка САЙТОВ
Что такое проект?
Проект представляет собой набор параметров, который содержит параметры свойств, которые определяют, как Веб-сайт будет загружен и сохранен автономным проводником. В зависимости от параметров проекта, проект позволяет пользователям выбирать, какие веб-страницы и файлы загружать и где их хранить.
Когда вы создаете проект, в настройках проекта автоматически устанавливаются стандартные настройки проекта. В большинстве случаев настройки по умолчанию позволяют вам успешно загружать Веб-сайт; однако, если некоторые из ваших задач более конкретны, вам может потребоваться настроить параметры проекта.
Например, вы можете определить параметры проекта для загрузки защищенного паролем веб-сайта, для начала загрузки в назначенное время и для ограничения загрузки определенных веб-страниц или файлов, таких как изображения, видео и графика.
Создание проекта
• Создание проекта с помощью нового мастера проекта
• Создание проекта с помощью диалогового окна «Свойства проекта»
• Создание проекта путем импорта избранного
• Создание проекта путем перетаскивания исходного URL-адреса
• Создание проекта с использованием шаблонов, если вы используете автономный Explorer Enterprise, мы рекомендуем использовать мастер создания проектов. В диалоговом окне «Свойства проекта» расширенные пользователи могут указать более подробные настройки.
Step 1
- On the Home tab, click New Project Wizard.
- On the Welcome to the New Project Wizard page, type the starting web address (URL) of the web content or site you want to download in the Project URL box. By default, the Project name is automatically saved as the title of the web page. However, if you would like to change it, you can do so at any time by typing in a new Project name.
- On the same Welcome to the New Project Wizard page, select the Download directory. This is where your downloaded files will be stored. By default, Offline Explorer Pro places all downloaded websites into the following folder: c:download directory. To change Download directory, click Browse and select where you would like Offline Explorer Pro to save your downloaded web content. Click Next.
Step 2
In the Levels limit box, select the number of levels you would like to download. This value determines how many levels deep from the starting URL a download should go. If you only need the first page and the images on it, set Levels limit to 0. To download all pages linked to the first page, set Levels limit to 1, etc. To download the entire website, clear the Levels limit check box. Click Next.
Note: If you clear the Levels limit check box, select Load only within the starting URL or Load only from the starting server on the Download location page of the wizard. This will prevent Offline Explorer Pro from downloading files from the entire Internet.
Step 3
Select the file types that you would like to exclude from the download. To download all file types, select Download all file that are linked to the starting page. To skip downloading certain types of files (Graphics, Video, Audio or Archive), select those that you would like to exclude and then select Skip loading the following file types. File types with a check mark will be excluded, while file types without a check mark will be included.
Click Next.
Step 4
Select a Download Location. Because web pages have different web addresses (URLs), even if they belong to the same website, Offline Explorer Pro enables you to download only those files you need by filtering web addresses. The following selections can help you define your download location: To download files and web pages only within the starting address (URL), select Load only within the starting URL. To download files only belonging to the starting server, select Load only from the starting server. This will skip downloading from other servers. To download files from all linked websites, select Load from any location. To download all images, select Load images from any location. Click Next.
Step 5
To start the download immediately, select Download the new Project now. To start the download later, select Download the Project later. To create a general view of the overall website contents (site map), select Generate site map
If you would like to adjust your download settings, select Setup advanced properties. Click Next.
The newly created Project will appear in the Project Tree panel.
Создайте проект с помощью нового мастера проекта.
Когда вы запустите автономный проводник Pro, появится экран мастера создания проекта. Если вы не хотите, чтобы экран New Project Wizard появлялся каждый раз при запуске программы, нажмите кнопку «Показать», когда «Автозапуск Проводника Pro» запускается на первой странице мастера создания проекта, чтобы очистить.Чтобы создать проект с помощью Мастера создания проекта, выполните следующие действия:
Шаг 1
• На вкладке «Главная» нажмите «Создать проект».
• На странице «Добро пожаловать на новый проект» введите начальный веб-адрес (URL) веб-контента или сайта, который вы хотите загрузить, в поле «URL-адрес проекта». По умолчанию имя проекта автоматически сохраняется как заголовок веб-страницы. Однако, если вы хотите изменить его, вы можете сделать это в любое время, введя новое имя проекта.
• На том же приветствии на странице мастера создания проекта выберите каталог «Загрузка». Здесь будут загружены ваши загруженные файлы. По умолчанию Offline Explorer Pro помещает все загруженные веб-сайты в следующую папку: c: download directory. Чтобы изменить каталог загрузки, нажмите «Обзор» и выберите, где вы хотите, чтобы Offline Explorer Pro сохранил загруженный веб-контент. Нажмите "Далее.
Шаг 2
В поле Ограничения уровней выберите количество уровней, которые вы хотите загрузить. Это значение определяет, сколько уровней в глубине от начального URL-адреса загружается. Если вам нужна только первая страница и изображения на ней, установите для параметра Лимиты значение 0. Чтобы загрузить все страницы, связанные с первой страницей, установите для Уровней ограничение 1 и т. Д. Чтобы загрузить весь сайт, снимите флажок Ограничения по уровням. Нажмите "Далее.
Примечание. Если вы снимите флажок «Ограничения уровней», выберите «Загрузить» только в стартовом URL-адресе или Загрузите только начальный сервер на странице «Загрузить местоположение» мастера. Это предотвратит загрузку файлов Offline Offline Pro Pro из всего Интернета.
Шаг 3
Выберите типы файлов, которые вы хотите исключить из загрузки. Чтобы загрузить все типы файлов, выберите Загрузить весь файл, который связан со стартовой страницей. Чтобы пропустить загрузку определенных типов файлов (Graphics, Video, Audio или Archive), выберите те, которые вы хотите исключить, и затем выберите «Пропустить» загрузку следующих типов файлов. Типы файлов с галочкой будут исключены, а типы файлов без галочка будет включена.
Нажмите "Далее.
Шаг 4
Выберите местоположение загрузки. Поскольку веб-страницы имеют разные веб-адреса (URL-адреса), даже если они принадлежат к одному и тому же веб-сайту, Offline Explorer Pro позволяет загружать только те файлы, которые вам нужны, путем фильтрации веб-адресов. Следующие определения могут помочь вам определить местоположение загрузки. Чтобы загружать файлы и веб-страницы только в начальном адресе (URL), выберите «Загрузить только в начальный URL». Чтобы загружать файлы, принадлежащие только исходному серверу, выберите «Загрузка» только с начала сервер. Это пропустит загрузку с других серверов. Чтобы загрузить файлы со всех связанных сайтов, выберите «Загрузить» из любого места. Чтобы загрузить все изображения, выберите Загрузить изображения из любого места. Нажмите "Далее.
Шаг 5
Чтобы сразу начать загрузку, выберите Загрузить новый проект прямо сейчас. Чтобы начать загрузку позже, выберите «Загрузить проект» позже. Чтобы создать общий вид общего содержимого веб-сайта (карта сайта), выберите «Сгенерировать карту сайта». Если вы хотите настроить параметры загрузки, выберите «Дополнительные параметры настройки». Нажмите "Далее.
Созданный проект появится на панели дерева проекта. Чтобы настроить параметры проекта, выберите новый проект в Дереве проектов и нажмите «Свойства»: вы можете ввести несколько URL-адресов для одного проекта. Введите один URL на строку.
Вы можете создать новый проект с исходным веб-адресом (URL), импортированным из следующих источников: Mozilla Bookmarks, Избранное Microsoft Internet Explorer, закладки Safari, закладки Chrome и горячие списки Opera.
Чтобы создать новый проект, импортировав «Избранное», выполните следующие действия:
• На вкладке «Главная» нажмите «Избранное», а затем выберите браузер, который вам нужен, из списка браузеров.
• Просмотрите меню и щелкните нужный URL. Затем будет создан новый проект.
What is a template?
A template is a predesigned format for a file or document that can be used repeatedly, without having to recreate that format each time it is used.
When you create a Project using a template, the Project will have the same settings as the template except for the starting URL.
Offline Explorer Pro offers the list of predesigned templates. In addition, you can use templates published on our website.
About Templates Editor
You can add, modify, or remove Project templates with the help of the Templates Editor dialog box.
Каким является шаблон?
Шаблон представляет собой предопределенный формат для файла или документа, который можно использовать повторно, без необходимости воссоздавать этот формат каждый раз, когда он используется.
Когда вы создаете проект с использованием шаблона, проект будет иметь те же настройки, что и шаблон, за исключением стартового URL.
Offline Explorer Pro предлагает список предустановленных шаблонов. Кроме того, вы можете использовать шаблоны, опубликованные на нашем веб-сайте.
О редакторе шаблонов.
Вы можете добавлять, изменять или удалять шаблоны проектов с помощью диалогового окна «Редактор шаблонов».null
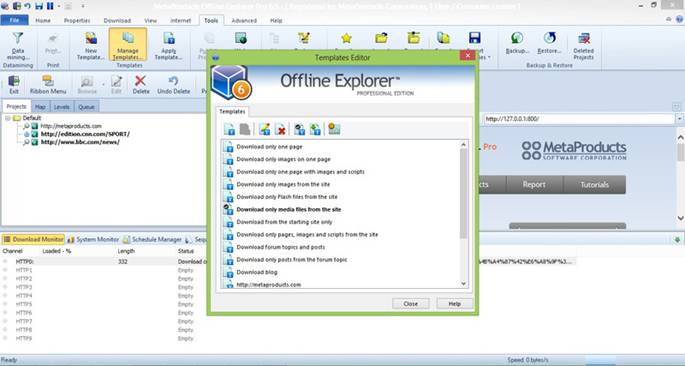
The Templates Editor contains the list of mostly used predesigned templates. For example, you can choose templates to download a blog, forum posts, or media files. Besides using the predesigned templates, you can create your own templates. The Templates Editor dialog box allows you to manage templates. The following options are available: edit the selected template, delete the selected template, create a template from a text file, make the selected template a default one, create a Project from the selected template.
Use a predesigned template
- On the Tools tab, click Manage Templates. A Templates Editor dialog box will appear.
- From the list of templates, select the predesigned template you need. The Project Properties dialog box will appear.
- Apply any changes if necessary, and click OK.
The newly created Project will appear in the Project tree panel.
Create your own template
To create your own template, do the following:
- On the Tools tab, select New Template. A new Template Wizard will appear and you can then create your own template.
The template you created wil appear in the list of predesigned templates in the Templates Editor dialog box.
Rearrange Folders
By default, a Project appears at the bottom of the list when it is added to the Project Tree. To rearrange your Projects and folders, click and drag the Projects and folders to a new location on the Project tree.
Rename a Project
To rename a Project, follow these steps:
- In the Project Tree panel, select the Project you need.
- On the Home tab, click Rename.. Type the new Project name into Project name edit box,and press the Enter key on the keyboard.
Rename a Folder
To rename a folder, follow these steps:
- In the Project Tree panel, select a Folder you want to rename.
- On the Home tab, click Rename
- In the Folder name box, type a name for this folder and press the Enter key on the keyboard.
Rename a Subfolder
To rename a subfolder, follow these steps:
- In the Project Tree panel, select the subfolder you want to rename.
- On the Home tab, click Rename
- In the Folder name box, type a new name for the subfolder and press the Enter key on the keyboard.
Delete a Folder
To delete a folder, follow these steps:
- In the Project Tree panel, select the folder you want to delete.
- On the Home tab, click Delete, and then click Folder in the list.
Delete a Subfolder
To delete a subfolder, follow these steps:
- In the Project Tree panel, select the subfolder you want to delete.
- On the Home tab, click Delete and then click Folder in the list.
Создание папок и подпапок
Если у вас есть несколько проектов, вы можете разместить их в папках. Например, вы можете хранить все проекты, загружающие новостные сайты в одной папке, и все проекты, загружающие фотогалереи в другую папку. Вы можете сделать это, создав новую папку или создав папку внутри существующей папки.
Переупорядочить папки.
По умолчанию в нижней части списка появляется проект, когда он добавляется в Дерево проектов. Чтобы перестроить ваши проекты и папки, щелкните и перетащите проекты и папки в новое место в дереве проекта.
Переименуйте проект, чтобы переименовать проект, выполните следующие действия: • На панели «Дерево проектов» выберите нужный проект.
• На вкладке «Главная» нажмите «Переименовать». Введите новое имя проекта в поле «Название проекта» и нажмите клавишу «Ввод» на клавиатуре.
Переименование папки.
Чтобы переименовать папку, выполните следующие действия. • На панели «Дерево проектов» выберите папку, которую вы хотите переименовать.
• На вкладке «Главная» нажмите «Переименовать». • В поле «Имя папки» введите имя для этой папки и нажмите клавишу «Ввод» на клавиатуре.
Переименование подпапки
Чтобы переименовать подпапку, выполните следующие действия: • В панели дерева проектов выберите подпапку, которую вы хотите переименовать.
• На вкладке «Главная» нажмите «Переименовать». • В поле «Имя папки» введите новое имя для подпапки и нажмите клавишу «Ввод» на клавиатуре.
Удаление папки
Чтобы удалить папку, выполните следующие действия: • На панели «Дерево проектов» выберите папку, которую вы хотите удалить.
• На вкладке «Главная» нажмите «Удалить», а затем «Папка» в списке.
Удаление подпапки
Чтобы удалить подпапку, выполните следующие действия: • В панели «Дерево проектов» выберите подпапку, которую вы хотите удалить.
• На вкладке «Главная» нажмите «Удалить», а затем «Папка» в списке.null
Delete a Project
- Delete a Project with its properties and downloaded files
- Delete the properties of a Project
- Delete the files downloaded in a Project
Удалить проект
• Удалить проект с его свойствами и загруженными файлами
• Удалить свойства проекта
• Удалить файлы, загруженные в ProjectDelete Project, с его свойствами и загруженными файлами.
Чтобы удалить проект со своими свойствами и загруженными файлами, выполните следующие действия:
• На панели «Дерево проектов» выберите проект, который вы хотите удалить.
• На вкладке «Главная» нажмите «Удалить», а затем выберите «Проект» в списке.
Download a Project
- Start a download
- Start the download of multiple Projects
- Pause a download
- Suspend a download to a file
- Resume a download
- Resume a download from a file
- Stop a download
- Restart a download
- Download new or modified files only
- Download missing files
- Create a site map
Once you have created a Project, you can begin downloading a Project’s website.
Note: Offline Explorer Enterprise allows you to download web content for one Project or multiple Projects simultaneously.
Start a download
To start downloading a website, follow these steps:
- In the Project Tree panel, select the Project with the website you want to download.
- On the Home tab, click Start

Note: When downloading, the icon on the left of the Project name in the Project tree panel will change to a green forward arrow. Once the download is complete, the Project icon returns to its normal state.
Pause a download
There are two ways to pause a download:
- To suspend a download
- To suspend a download to a file
Suspend a download
When you suspend a download, the downloading of files will not be stopped immediately. The program will complete the downloading of the current files before it pauses.
To suspend a download, follow these steps:
- In the Project Tree panel, select the Project you want to suspend.
- On the Home tab, click Suspend
Note: When you click Suspend, the icon on the left of the Project name in the Project tree panel will change to a pause icon.
If you have several active downloads, click the Suspend arrow to see all active downloads and select the download you want to suspend.
If you want to suspend all active downloads, click Suspend on the Home tab.
Offline Explorer Enterprise will finish downloading the current files, but the downloading of other files will not continue until the download is resumed.
Resume a download
After you suspend a download, you can resume the download
To resume a download, follow these steps:
- In the Project Tree panel, select the suspended Project that you would like to resume.
- On the Home tab, click Suspend.
Stop a download
To stop the downloading a Project, follow these steps:
- In the Project Tree panel, select the active Project you want to stop.
- On the Home tab, click Stop
If you want to stop the downloading of all active Projects, click Stop ALL on the Download Tab
Note: Offline Explorer Enterprise wi